WHAT IS PRODUCT DESIGN? (1)
V. Ryan © 2007
|
Product Design involves a broad approach to the designing and making of innovative / new products. This subject is aimed at those interested in the way business and industry identifies potential products and successfully designs and manufactures them. It is not for those who intend to design and manufacture an item that already exists. However, you can take an existing product and improve it or develop an entirely new product. |
This subject is aimed at those interested in the way business and industry identifies potential products and successfully designs and manufactures them. Contact with potential customers is vital. Designers and manufacturers try to find out what the public want from old products - how they can be improved. Designers also want to know what the public wants from new designs. this is often carried out through questionnaires and surveys.
Product Design is not for those who intend to design and manufacture an item that already exists. However, you can take an existing product and improve it or develop an entirely new product. There are many examples of this, for example, the bicycle. Bicycles have been used for centuries and new innovative designs are being constantly developed. Mobile phones are also under constant development and improvement.
Product Design involves the detailed study of the manufacture of products. This means carefully studying how products are made on traditional equipment such as metal turning lathes and milling machines AND also modern machines such as the one shown below. This is a Rapid Prototyping machine that is able to manufacture an accurate 3D model of a computer design. Models are amazingly detailed.
Single Item Manufacture, Batch Production and Continuous Production are studied. Product Designers must understand the way a product can be made using each of these systems of manufacture.
The manufacture of models and prototypes is an essential aspect of any Product Design course. You will be expected to make and modify prototypes and models using materials such as Styrofoam, foam clad board, MDF and a range of other modelling materials. Sometimes a skilfully made prototype of model will be the final outcome.
|
COMPUTER AIDED DESIGN: You will be expected to use a range of ICT techniques as well as other methods of presenting your work / ideas. If you have access to ICT at home ensure that you use it to enhance / improve you grades. Researching on the internet, using Computer Aided Design software such as Google Sketchup, pro/Desktop, Corel Draw etc.... will usually result in a good grade. |
||
|
SPREADSHEETS: Using a spreadsheet for working out the costs of your project will also help. Spreadsheets can be used to calculate the costs involved in the manufacture of a project. The most popular spreadsheet is called EXCEL and can be used by beginners and professionals alike. spreadsheets can be set up to calculate totals and tax automatically. Spreadsheet software is capable of processing complex calculations and formulas. You will need to master the basics of spreadsheets as part of any product design course.. |
||
|
USING A LOG BOOK: Regularly photograph your work and keep a log of your weekly efforts. Keep a record for each stage of manufacture as this shows good planning. For example, when manufacturing models and prototypes photograph every stage and place them in the log book. Screen shots of your use of software will also be helpful. |
||
|
When working through a project you must use a range of drawing techniques and also Information Technology must play an important part. |
||
|
In order to achieve higher grades it is essential that your project follows the full design process. For each section listed below there are detailed information sheets and guidance sheets later in this information pack. Below is a project check list: |
||
DESCRIPTION OF STAGE
At the beginning of the project place the theme at the centre. Put words / themes that are connected to it, around it.
A ‘Rich Picture’ is the first stage in the design process.
When you start designing, the theme is placed in the centre of the page and link
words are positioned around it. This can be seen on the example above, a rich
picture for the theme Clock Design. These link words should be related to the
centre theme and they will help you think of points that you must consider when
trying to solve the design problem.
For example, the word ‘materials’ may prompt you to consider different woods,
metals and plastics that could be useful when trying to work out the best
materials for your solution. In this way you should write as many words as
possible around the theme but only if they have some link. A rich picture must
also have pictures or diagrams to give a good, clear, visual effect. Without
them it is a diagram.
Developing a Customer Profile - page1 - Who are your potential customers? Carry out a Customer Profile Questionnaire. You need to build a Potential Customer Profile. Then produce a final Client/Customer Profile Sheet, once you have been commissioned to design and make a product.
State the design problem clearly. Explain how you intend to solve it in general terms.
DESIGN PROBLEM AND BRIEF
The Problem and Design Brief are sometimes viewed as two different sections of the design process. However, they are very closely related. Before you can can start a design project you must find a ‘problem’ to solve. Sometimes this may be given to you as a question set by the teacher or the Examinations Board and is usually a paragraph of writing. The ‘design brief’ follows the ‘problem’ and states clearly how you intend to solve the design problem.
Below is an example of a design problem and brief. Remember, the presentation is important especially if you are taking the Graphic Products course. Above all the problem and brief must be easy to read and follow, clearly saying what the problem is and how you intend to solve it.
DESIGN PROBLEM
A number of houses have been broken into on my street. It has been noticed that the number of strangers walking down our street has increased lately and house holders are becoming concerned about the security of their houses. The police have advised people to make their houses look as if they are occupied when they go away for a holiday or even out for the evening. This may deter a potential thief from breaking into either the house or garage.
The Neighbourhood Watch scheme has also been introduced recently and this has helped people feel more secure. However, even though neighbours will keep an eye on your property if you decide to go out and leave the house empty, they cannot watch twenty four hours a day.
Often even the police ignore house alarms when they are activated because of the high number of false alarms.
DESIGN BRIEF
I am going to design and make a security device that will make my house look occupied when, in fact, it is empty. Police statistics clearly show that houses are much more likely to be broken into when they are empty. Consequently, if the house looks occupied it is likely to be safe.
The device will be mobile so that it can be moved from room to room, easy to set up and control and also cheap to make. It must not be powered by mains voltage and in this way it will be completely safe to be left ‘on’ for a long time and will not be affected by power cuts. It will be activated by anyone approaching the hose from the front or back.
It must deter even profession crooks from taking an interest in our house and even convince people in the street that the house is occupied.
FURTHER INFORMATION
The brief and problem shown below has been produced for a
project based on an educational toy.
THE DESIGN PROBLEM
1. The brief and problem is mainly text (writing) that is printed
in a clear style so that it can be read and understood easily.
2. The problem is a paragraph or more in
length. It describes the problem you are aiming to solve. Do not say how you
intend to solve the problem, only what the problem is. If you have been given a
examination question as your design project, add more detail. The example
opposite is based on the following examination question:
“Design and make an educational device for young children. It must improve hand
and eye coordination”.
The problem written opposite is a more detailed and imaginative way of writing
the examination question. A pedestrian crossing simulator has been selected by
the pupil as the educational device.
3. The first sentence should state the
problem, adding more detail with the following sentences.
4. If the examination question does not name
the product that has to be designed and made (such as an educational device) -
you can mention an area that you are interested in. This could include, jigsaws,
puzzles or something that could be adapted as an educational device.
THE DESIGN BRIEF
1. Always start the design brief with “I am
going to design and make .....”. This is followed by a general description of
the type of device you feel will answer the design problem.
2. Do not be too specific. The brief should
be a general description that allows you flexibility regarding the type of
product you intend to make. For example, if your are designing an automatic
animal feeder it may be a good idea not to say the type of animal it is for, at
least not at this stage in the project.
3. Do not be specific about materials. It
may be wise to avoid stating the exact materials it will be manufactured from (eg.
pine, steel, perspex etc...). Instead describe the materials to be used as
strong, tough, flexible, natural, manmade, recycled, water-proof or similar
general descriptions.
4. Mention points such as; safety, general
size, what it will do (it’s functions), general properties of the materials
needed, who it is for (eg children), basic cost of manufacture or a lower and
upper cost limits, circuit requirements and other points you feel are important.
An alternative approach to writing a design problem followed by a design
brief, is to study the Client/Customer
Profile Sheet. Identify the design problem/problems outlined by the customer
/ client and compose your Design Problem. Consider using this Problem
Page, to help write this difficult aspect.
Then write a design brief. Consider using this Brief Page,
to help your write your Design Brief.
Produce a moodboard based on interviews and discussions with
your client and the theme he / she wants you, as a designer, to research.
The Designer
and Moodboards - 1
Designer
Inspiration and Moodboards - 2
Inspiration /
Moodboards and Motifs
List as many questions as you can about the project you are attempting. E.g. What materials can I use ? What safety considerations must I keep in mind ?
The ANALYSIS is one of the early sections in the design process. It involves listing as many questions as you can think of regarding your project. The questions will vary from project to project but usually the majority of these questions are the same, whatever the project you are attempting. The questions below may be useful especially if you adapt them to suit your current project. Remember the SYNTHESIS is the following section in the design process and is a list of answers. You may not be able to complete the synthesis until you have almost finished the entire project.
EXAMPLE QUESTIONS FOR THE ANALYSIS
1. Will the design be safe ?
2. What materials are available ? What materials will be the most suitable? What
will be the overall size ?
3. How long will the product take to manufacture ?
4. How will the product be mass produced ? On a production line ? What will the
cost of ‘labour’ be ?
5. What is the best shape for the solution ?
6. What colour scheme will be most appropriate ?
7. What are the functions of the product ?
8. What type of circuit is required ? Is a timer required ? Are flashing lights
needed ?
9. What special features need to be built into the designs ?
10. What ‘ergonomic’ factors need to be taken into account ?
11. What designs already exist ? What do you think of them ? Could they be
improved ?
12. What are the addresses of manufacturers and suppliers who may help me design
my product ?
13. Where can I collect research material to help me design ?
14. Who is going to buy my product ? What is the age group ?
15. Is my solution likely to solve the design problem ?
16. What equipment and machinery will I need for manufacture ?
Answer the questions in the analysis.
The ‘Synthesis’ is the section that follows the ‘Analysis’ and is the answers to the questions. Usually it is impossible to answer all the questions until you have nearly completed the the design project. You will find that some questions can only be answered when the research section has been completed. For example, any question on the choice of materials, or the way ergonomics is applied to your project, must be answered after you have researched these important areas.
EXAMPLE ANSWERS FOR THE SYNTHESIS
1. Will the design be safe ?
My design will be safe because I will test a
model/prototype first.
2. What materials are available ? What materials will be the most suitable?
Compressed polystyrene will probably be the best material
and I will use it if my research tells me it is light and strong.
3. What will be the overall sizes / dimensions ?
The dimensions will be - 300x450mm.
4. What will be the overall cost of manufacture ?
I expect my solution to cost no more than £9.99 to
manufacture. I will work out this cost by looking at the cost of materials and
labour in the research section.
5. How long will it take to manufacture my product ?
My design will take 15 hours to manufacture by hand and 20
minutes on a production line.
6. Can my product be manufactured on a production line ?
I will set up a small production line composed of 4 people
(add a little detail).
7. What is the most popular shape for the product ?
I will carry out a questionnaire to help me work out the
most popular shape.
8. What colour scheme is the most suitable for my product ?
My questionnaire suggests that a blue/green based colour
scheme will be the most interesting.
9. What are the functions of the product ?
The product will do the following: (list what it will
actually do).
10. What type of circuit is required ? Is a timer required ? Are flashing lights
needed ?
I need a timer and a flashing light circuit.
12. What special features need to be built into the designs ?
The solution will also include movement.
13. What ‘ergonomic’ factors need to be taken into account ?
I will carry out ergonomics research to work out the size
most suitable for my design.
14. What designs already exist ? What do you think of them ? Could they be
improved ?
My design will improve any existing design and it will be
cheaper.
15. What are the addresses / email addrsses of manufacturers and suppliers who
may help me design my product ?
The following manufacturers will be contacted: (list
addresses).
16. Where can I collect research material to help me design ?
I will collect relevant information from the internet. I
will go to the library, write to/email manufacturers, look at existing designs
etc...
17. Who is going to buy my product ? What is the age group ?
My design will be aimed at the general public.
18. Is my product / solution likely to solve the design problem ?
My design will completely answer the design problem.
19. What equipment and machinery will I need for manufacture ?
I will need general tools and machinery to manufacture my
design.
FURTHER INFORMATION
The synthesis shown below has been produced for a project
based on an educational toy .
1. The
synthesis (answers) should be general, do not try to be too precise. For
example, if you are answering a question about choice of colours for your
project, list a range rather than a single colour. This will allow you to change
your mind later.
2. By
the end of the project all the questions posed in the analysis should have an
answer in the synthesis.
3. The
analysis and synthesis can be on separate pages if necessary, although usually
they fit comfortably on the same sheet.
Use a time chart and flow chart to plan your use of time.
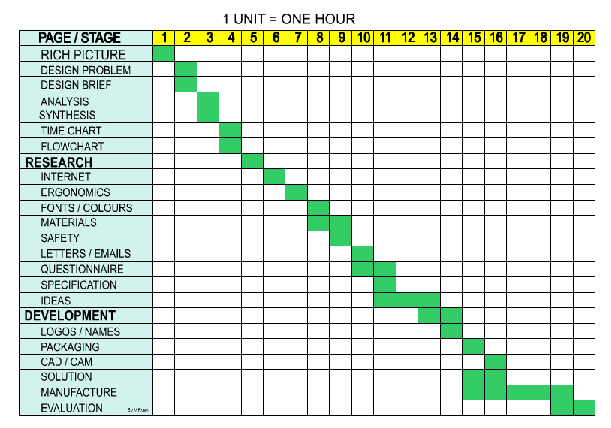
A Time Chart is a way of planning your project. Below is a simple grid and the stages of the design process are listed down the left hand side. As part of your project you need to show how much time you intend to spend on each section of the project. Included is a key which shows the amount of time that each unit represents. When you devise your time chart you may wish to include all the sections involved in research or add sections that apply to your individual project.
FURTHER INFORMATION
The time chart shown above is a basic layout. When attempting
a graphics project you will need to draw it in a more imaginative way.
1. The example shows the stages/pages of design
listed on the left hand side. You may decide to set the stages out in a
different way. However, you still need to list all pages/stages.
2. On your time chart you must clearly show how
much time has been allocated to each stage.
3. Consider including a key which states the time
each stage on the chart represents. On the example the key is at the top (1 UNIT
= ONE HOUR)
4. Consider including additional pages/stages that
only apply to your project. This may apply especially to the research section of
your project.
5. Keep the pages/stages to between 25 - 30 in
number.
6. You may want to leave blank areas for
pages/stages that you may include later. For example, You may be considering
making a small model near the end of the project. One page could be set aside
for photographs of its construction.
7. It is possible to produce two time charts. The
first will represent the designing and the second the manufacturing and all the
stages of making. If this is the case, the designing time chart can be drawn
early in the project and the manufacturing time chart near the end.
8. The time chart must be easy to follow. Keep the
layout simple but add colour and shade to enhance it.
9. If you have been told that there are a limited
number of hours for your project - the total hours represented on your time
chart should add up to this.
SUGGESTIONS
A. On paper list all the
pages / stages you intend to include in your design folder.
B. List all the stages of manufacturing, if
you know them at this stage. You may wish to have one stage representing all the
aspects of making (as seen on the example above).
C. Look at examples of time charts as these
may give ideas regarding the layout of your chart
D. Complete your homework on time. Do not
fall behind as you may find it impossible to catch up.
If you are to get a high grade you must put effort into this section. Remember, all research must be relevant to your project and constantly refer to the problem you are trying to solve. Produce at least one sheet on each of the following:
Suitable materials for your project.
Investigate the ways in which materials can be joined together - joints and fixings.
The ergonomic factors that apply to your project.
Safety factors related to your design problem.
Write letters to manufacturers / shops.
Research using the library.
Research using the Internet / CD-ROMs/DVDs.
Interview people with the aim of helping you to solve the design problem (record the interview).
Carry out a survey / questionnaire and present the results as a pictogram/table of results
Product Review - select an existing product and determine how it could be improved. This will help you develop your own ideas later.
Collect pictures of existing products - photographs/catalogue pictures.
How are existing products manufactured?
Research other relevant areas such as electronic circuits.
| Research is a very important aspect of any project and if you want to achieve a high grade you must complete all the sections below and any others that are relevant to your individual project. | ||
|
The Library - Go the the library and look up information related to your project. Collect anything that could be useful - written work, information diagrams, pictures and present all this in your folder. You may need to photocopy. |
What research do you intend to do at the library ? | |
|
Materials - Collect information about a range of materials and include this in the research section. Remember, you must always say how the materials could be used in your designs or why they are not suitable. Never copy straight from a book. |
What information on materials do you need to collect ? |
|
|
Photographs - Take photographs of anything that will help you in your research. For example, if you are designing a toy for a very young child you could visit a nursery and take photographs of children using toys and include this in your research section. |
What could you photograph for your project ? |
|
|
Personal interview - Interview someone who may be able to help you with your research. For example, if you are designing a clock, interview someone who deals with clocks or even helps to make them. Tape the interview and hand it in as part of the research. |
Who could be interviewed and what information could they give you ? |
|
Test existing examples - If possible, collect some existing examples of the type of product you are designing and test them. Do they work properly ? Can they be improved in any way ? Write an account of each test and take photographs or video. |
List some existing products. | |
|
Ergonomics and Anthropometrics - (see separate sheet) These two areas apply to all projects. At least one sheet should be devoted to this area. |
What ergonomics information will you need to research ? |
|
|
Environmental and Cultural aspects - What are the environmental benefits of the products you have researched? How do they benefit us ? |
How could you apply the environment to your project ? |
|
|
The Survey/Questionnaire - You must carry out a questionnaire and present the results as a pictogram or graph. Usually pupils present the results as a table of statistics as well. |
What type of questionnaire could you carry out ? | |
|
Examples from Catalogues / newspapers / books etc.... Photocopy / draw examples from books and catalogues and arrange them carefully on sheets of A3 paper. Write notes about the pictures and always say what you think of the examples. |
Name some existing products and how much they cost. |
|
|
CD-ROM / Internet - Use a CD-ROM to find information that you could include in your project. This may involve using an encyclopaedia on CD to look up information. Always state clearly that the information was printed from an encyclopaedia on CD-ROM. This type of research will gain you extra marks. |
Name a website that may be useful for researching your product/design problem. |
|
|
Safety - You must look at the safety of any item you are designing. Look at existing examples and make notes stating clearly what is good in terms of safety or how they could be improved. |
Why is safety important ? | |
|
Colours / Themes / Image etc... Choosing the right colours or colour scheme is very important for most projects. Investigate different colours and shades of colour and try them out on paper. Add your comments. |
Is colour important for your research ? Why ? | |
|
Mass Production - Explain how the product you have researched was made on a production line. |
What types of mass production are there ? |
Once you have completed your design you should specify in a paragraph or two what exactly you are going to do to solve this problem. Always refer to your research.
| 1. The materials I will use will be
compressed polystyrene, pine and MDF because my research clearly shows that
this combination will improve my solution. 2. The overall shape will depend on the ergonomics of the hand. I will base the dimensions on statistics worked out as part of my research. 3. I intend to use a colour scheme based on red and blue because the questionnaire I carried out shows these are the most popular colours. 4. The solution will have the following functions: (List exactly what the solution will do). 5. The solution will stand on a desk / fixed on a wall. 6. I will need the following tools/machines to manufacture my solution: a lathe, drilling machine, hand files, a vacuum former etc...... 7. The solution is aimed at the 12-15 age group as my research suggests this would be the most successful market. |
|
|
Write a specification for a project of your choice. You should be able to list quite a number of points in your specification but always say how your research has helped you. Usually this section is a list of approximately 10 points. |
|
|
FURTHER INFORMATION |
|
|
The specification is probably the easiest section of a design project, if all the research has been carried out. The specification draws on the information collected and presented during the research section. The specification is a number of straightforward statements, made clearly outlining the nature of the project to be designed and manufactured. If the research section has not been completed fully, the specification will also be lacking. |
|
|
The example specification shown opposite has been written
for a project regarding designing a small electronic/mechanical toy for
young children. |
|
Draw at least six ideas, with notes. The ideas should be different and not just the same idea slightly changed. Include environmental considerations (See additional sheet). Use Computer Aided Design (CAD) when drawing some of your designs/ideas.
|
This section allows you to present a number of ideas/designs. You should aim to produce at least six different designs and certainly not less than four. The more designs you produce the better the mark you will gain. However, if your ideas are very similar, the final marks will be reduced. Try to present designs that look individual and are imaginative. |
||
|
The Importance of Notes: |
|
One of the most important sections of a design project is the ideas section. Drawing designs / ideas is possibly the most enjoyable aspect of project work. This is the section in which you must show your imagination. The examiner will look closely at the ideas you produce and the way you present them and the quality of notes you include with each. Try to produce a minimum of four ideas and aim for up to six well drawn and annotated ideas. You may wish to start by looking at an existing idea and altering it / improving it. Be innovative. |
|
| 1.
Research very carefully into ideas / products that already exist. The
internet is usually a good resource. Looking at existing designs will help
you design your own product. 2. Always include plenty of relevant notes. A. What do you think of the design? B. What do you think of the colour scheme? C. How much will it cost to produce? D. Is the design safe? E. Would you buy it? F. Would you find it useful? G. Does your idea answer the design problem? H. Is the design too large or small? I. Is it designed ergonomically? J. Will it suit the age range that it is designed for? K. What materials will be used in it’s manufacture? Why are they suitable? 3. Keep your drawings simple and clear. You may wish to draw your idea from different angles, in perspective, isometric, from the front, top or side. 4. Add colour and shade but do not spend too much time on this aspect of each drawing. Sometimes it may be better to keep a design to a ‘line drawing’, without any colour / shade. 5. Ask the views of other people, especially if you are drawing rough designs before transferring them to your design sheets. You may learn a lot from the views expressed by other people. 6. When you write your notes about each of your ideas tell the truth. You may concentrate on the way the idea needs improving rather than concentrating on all the good points. 7. Produce a range of different ideas not a number of similar looking ones. |
|
To get the higher grades you must take your best idea and develop it further.
One way of starting this section is to draw your best idea again and point out
areas that can be improved. Areas may include, safety, colour scheme, cost, using a
spreadsheet, shape, materials, mechanisms, circuits, systems diagram
and the
environment. You must show that you have considered Safety and the
Consumer. You also need to develop a circuit for your project. You may need to show how mechanisms can
be used as part of your design. How will all the parts/components be joined
together? What
joints and fixings will be needed? Stages of
programming a microcontroller circuit (flow chart). Make a series of models
and evaluate each one. Carry out a Product
Comparison to help develop a design. Click here for
Product Comparison layout sheet and templates. Include a Technical Data
Sheet in your design project - Technical Data
Sheet Template. Ask a Focus Group
(group of individuals) their advice regarding your designs and models. Consider
the Life Cycle
of your product, presenting it as a graphical design sheet.
Developing A
Design From A Theme (1) - Developing A
Design From A Theme (2)
Practice
Examination Question - Sample
'Theme' Development Design Sheet
|
The Development follows the IDEAS section. A good way to start a development is to draw your best idea in the middle of the page and write around it areas of your design that need improving. For instance, you may need to improve the colour scheme OR the circuit may need improving further. Alongside each area write a few notes of explanation. Then, produce one A4 sheet for each area e.g. See circuit ‘development'. |
||
|
CAN YOUR DESIGN BE IMPROVED ? |
||
|
|
||
|
MATERIALS - You must choose materials and state how they can be combined to produce your final design. |
|
COLOUR - Produce a colour scheme for the final design. |
|
SAFETY - You may be able to show how you have improved the safety aspect of your design. |
COST - Work out the cost of your product. You may wish to use a spreadsheet for this purpose. |
|
|
CIRCUIT - Select a circuit from the ideas section and improve it further - stage by stage. |
MECHANISM - You may need to develop mechanisms or gear systems for your project. |
|
|
SHAPE - Can you improve the shape of your design ? If so show how. |
INDUSTRIAL MANUFACTURE - You must draw each stage of your ‘products’ manufacture (in industry). |
|
|
Above is an example of an educational toy. Notes are arranged around the drawing, referring to various aspects of the design that can be improved or need developing |
||
| You must decide the areas to develop. Think carefully how your design can be improved ! | ||
|
The development section of a project is extremely important especially if you are aiming for a high grade. In this section you must select your best idea and explain how it can be improved and investigate new aspects. On the first sheet the best idea is drawn and aspects that can be improved are identified. All designs can be improved and outlined below are aspects that you may wish to consider when improving your idea. Costing your project and Health and Safety relating to it must also be investigated. |
|
|
1. Select your best
idea carefully. You may decide that selecting aspects from many designs and
putting them together as one idea is preferable to selecting one complete
idea from a range. |
|
A. Ask the views of others regarding
which of your ideas is potentially best.
B. Take time to decide which aspects of your
design need improving and which need further investigation.
C. Draw the idea in the centre of the page,
keep the drawing simple, clear and accurate.
D. Keep notes simple and precise and arrange
them around the drawing.
E. Complete your homework on time. Do not
fall behind as you may find it impossible to catch up.
Instead of producing an Ideas section followed by the Development section,
combining both is an alternative design approach.
Each design sheet should start with an initial idea and include some
development.
Sample
Ideas Sheet 1
Sample
Ideas Sheet 2 - Starting with an Existing Idea
Sample
Ideas Sheet 3 - Starting with Properties of Materials
Sample
Ideas Sheet - Starting with an Iconic Design
Materials
Research / Development - a Practical Approach
Materials
Research / Development Summary Sheet
Advanced
Material Tests
Modelling
an Idea with Corrugated Card
The Card Model
Development Section
Model Making -
Record of Manufacture
Sample Scaled
Model Summary Sheet
Sample
Layout to Model Making Sequence Drawing Sheets
Model
Making Sequence Drawing - 1
Model
Making Sequence Drawing - 2
This section shows alternative way of presenting your design ideas and
developing them, in an integrated way. This is an
alternative to having a separate section for drawing ideas and another
section for the development. Aim to produce up to ten good quality sheets, that
show the development of your product, from a basic idea to a developed final
design.
Click here
for sheet 1
Click here
for sheet 2
Click here
for sheet 3
Click here
for sheet 4
Click here
for sheet 5
Click here
for sheet 6
Click here
for sheets 7, 8 and 9 (Final Developed Idea)
Click here
for sheet 10 (Working Drawing and Isometric View)
Produce a working drawing of your solution with a parts list. This must have measurements and constructional details. You may prefer to produce a Parts Sheet first. A three dimensional drawing can also be attempted.
Produce planning sheets to show each stage of production - a flowchart,
time chart,
sequence drawing.
Make a further
model.
Make the solution. Keep a Logbook
up to date
The Manufacturing Specification is an alternative to producing separate
sheets for the manufacturing flow chart, sequence drawing and final 3D drawing.
It is a concise sheet, which summaries each of these design sheets.
When creating this sheet, check everything you write and draw against the
specification you wrote earlier in the project, after the research section.
Click here
for further information on the Manufacturing Specification.
Do not forget this important section. Evaluate your product. State the good and bad points. Does the solution answer the design brief ? Spend some time on this section. You should include social issues, health and safety, ethical and environmental issues.
|
Designers evaluate their finished products or prototypes
in order to test whether they work well and if the design can be corrected
or improved. Whatever you have designed it is important to evaluate your
work constantly during the project. |
||
|
General discussion with other pupils, staff and others. |
||
|
CONSIDER THE FOLLOWING POINTS WHEN WRITING YOUR FINAL EVALUATION |
||
| 1. What do you think of the overall design ?
What changes would you make ? 2. Are you happy with the materials you chose ? Would you make adjustments next time ? 3. Is the colour scheme exactly what you expected ? What alterations would you make ? 4. Did the project take too long to make ? Would this alter the cost of manufacture ? 5. Would it be easy to set up a production line for the manufacture of your solution ? 6. Is your solution safe ? Could it be made safer ? 7. Are the techniques you used to make your solution adequate or would you use a different range of manufacturing techniques ? 8. Is the solution the right size/shape ? 9. What are the views of other people regarding your design ? 10. Does it work ? What changes are required ? |
||
|
The final evaluation is often neglected because it is the last part to any design and make project. Do not make the mistake of completing it quickly or not doing it at all. The final evaluation is usually quite easy to write and counts for a high proportion of the marks. |
||
An alternative approach to evaluating a product, is to test evaluate in an
integrated way. Using this approach, a developed product (usually a prototype)
is put through a number of tests and the results recorded.
Testing
and Evaluation - Why?
Testing
and Evaluation Sheet 1
Testing
and Evaluation Sheet 2