By Denny Brown On
One of the many surprises for new guitar building students is how long it really takes to build a guitar. That prompts the question, “How can I learn to save time and decrease my building time?” I posed this question to two groups: The Robert O’Brien Guitar Building Forum and the LinkedIn Luthier Built Group. Some answers are obvious, others came from years of experience. A few responses took me by surprise.
From the feedback, I divided the recommendations into four chapters:
In this chapter you will find suggestions on what to do before opening a bottle of glue or cutting any wood.
Lots of time is wasted just finding things. First, make sure all of the materials you ordered arrived. Grabbing materials on the fly is inefficient, bringing you to a halt when something is missing in action. It is no less frustrating to damage a part, such as a bridge, and not have another blank available. I stock extras of inexpensive items, such as nut, saddle and bridge blanks, as well as bindings. I even keep an extra fretboard around. Urgent shipping can cost more than all of those, combined.
Learn how to properly sharpen tools. Most students I have worked with did not initially know how to sharpen chisels and scrapers. They have never experienced cutting wood with truly sharp tools, an experience akin to discovering really good champagne. Dull tools work more slowly and are more likely to cause damage. Rather than slicing through wood fibers, a dull chisel has a tendency to find its way into a grain line and cause tear out. That can lead to “Plan B” – a repair, which of course adds more time. Keep tools clean and adjusted, ready for work.
Now that you know what you have, get it organized so you know where everything is. If you have drawers, you may want to label them. Until you have built several guitars, you may not remember where everything is. Advancing age doesn’t help, either. Looking for tools at the last minute before gluing is not efficient.
If you can afford the luxury of a roomy shop, put together separate workstations. Setup is probably the most time consuming step in woodworking. Having an area designated for neck tenon cutting, brace gluing or routing binding channels will save time.
If you can set up dedicated tools, do so. For example, I own six routers; three are the same laminate trimmer model. One laminate trimmer is used to cut binding channels and another is used for routing the rosette channel. These two routers require custom bases and I don’t want to readjust them. The third laminate trimmer is for general use, which can be set up with a quick bit change. I have a Dremel for inlay work and cutting steel string saddle slots. I bought a small, inexpensive bench-top router table and router to cut truss rod slots in the neck. Finally, I have a beefier router to cut the mortise and tenon for steel string guitars.
Build for someone. A paying customer is one key to faster building, one of many pieces of advice from Paco Chorobo of Granada, Spain. I find that as I build for a customer, friend or family member, I think about their personality, and their musical interests. I make adjustments as I go because of those thoughts. But, most importantly, I can imagine the new guitar in their hands, which motivates me.
This part addresses methods for efficiency while building.
For each step, review what is involved ahead of time. If you have a video or a book or both, use them. Take notes. Rehearse mentally, imagining the process in your mind. Will you need help? Make arrangements. Consider what might go wrong and how you would fix it. In other words, think through “Plan B.” Many believe that the more you think about Plan B, the less likely you will need it. However, avoid analysis paralysis. At some point, you must move ahead.
During the rehearsal process, lay out materials and tools so they are readily available. This is the last chance to discover that something is missing or not ready.
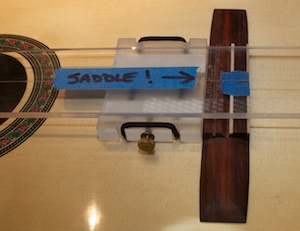
Jigs can be made or purchased for nearly every step of guitar building. Just ask Charles Fox. Better yet, find the Summer 2012 issue of American Lutherie for a feature article on many of his jigs. Write notes to yourself on the jigs to remind yourself of critical steps or measurements.
We have a tendency to make cauls from scrap. That’s fine, but why return them to the scrap bin when done? I keep them. I make cauls out of various materials: wood, particle board, MDF and Plexiglass. Glue doesn’t stick to Plexiglass and Lexan. Mark them for their purpose.
Damage means a setback in time, especially after a piece of wood has already become part of the guitar. I make a poster board cover for my guitar tops, only removing it when I am ready to work on the top. When transporting any part of the guitar, I keep it protected. Unfinished tops and backs go in an artist’s portfolio bag. Larger parts travel in a gig bag or case. Unbent bindings live in a poster tube.

Plenty of luthiers become disoriented when radiusing the top or back, for example. I mark my guitars with tape: top, back, left right. It is hard to overdo. I also use it to make marks when I don’t want to write directly on the wood.
Saw cuts in wood are forever. If you are not sure how to make them, practice on scrap. The same advise goes for finish. Gregoire Fulgham, also cited in the most recent blog says, “Know your finishes, test them on scrap wood, and assess the results BEFORE you do any finish work to your instruments.” Testing, testing, testing…
Taking a class with a good teacher contributes significantly to building efficiency. Ideally, teaching is face to face, so you can ask questions. The next best option is videos. I am partial to those made by Robert O’Brien, and wrote books to accompany them. If I had it to do all over again, I would have built my first guitar in person with him in his Intensive Course. With a book, you are pretty much on your own. If building guitars is “practice towards perfect,” be sure to practice properly. The closer you can get to a live instructor, the better guided your practice will be.
The more guitars you build, the more efficient you will become.
This chapter continues with “While You Build” theme, but taken to a higher level – multitasking.
Multitasking means working on more than one step at a once, which avoids down time. My first guitars were built on a very linear timeline. First the body, then the neck, attach the neck, and so on. But there is no reason that the back and top can’t be joined while glue is drying on the neck. In fact at the beginning of building a guitar, there are seven task buckets: neck, sides, back, top, bindings, fretboard and bridge. One can easily move back and forth between these.
Glue drying time and sides cooling in a bender are what allow us to multitask. The primary strategy is to work towards a glue joint first thing in your building session. When glue is drying and you move onto another task, you are, in effect, doing two things at once. With Titebond, you have 30-60 minutes of down time. With fish glue, for example, you have hours.
I made multi-tasking flow sheets for building classical and steel string guitars. A sample is found below. The full flow sheets are available in the Flatiron Frets Catalog.
Once glue is dry, the strategy is to perform steps to get another joint glued up.
Building two guitars at once is faster than two done sequentially. Several forum participants recommended this. Setup is time consuming, so performing the same construction process twice in a row after a single setup is generally faster. A word of caution: If you do a step wrong the first time, you may do it wrong twice. Also, there are times when steps should be customized to the particular guitar.

Methods to build guitars are, in some cases, centuries old. Have a really good reason to make a change, because it will often slow you down. New plans can lead to more mistakes, which will also slow you down.
Keep it simple and avoid new designs with the first several guitars. It is hard to master the building process if you are constantly changing it.
Different materials behave differently. Many slow you down as you accommodate for the different properties.
Several luthiers from around the world objected to speedy construction. “What’s the point of building fast?,” they asked. ”Isn’t the process supposed to be enjoyed?” Invariably, it was experienced luthiers who posed these questions. Many recounted losing the joy of building when they had to work in production mode just to afford rent and food. Solutions included finding a day job, usually in instrument repair, reserving free time to enjoy building again. Peter Sargent in Minnesota says, “I repair violins and bows because I have to, I build violins, because I want to.” Some quit. After 20 years of guitar and mandolin building, Chuck Morrison, also in Colorado, stopped building altogether, and pursued another career. He returned to building guitars in 2009 and now refers to mass production as “greater than one”.
Somewhere there has to be a balance. For example, I have a day job to put the kids through college and afford this hobby. I build and teach guitar building for fun and to earn the occasional commission. My balance is when I feel I am working as efficiently as I can without ruining the experience. Wasted time is as disconcerting to me as working too fast.
It may be that making a living from building guitars is not possible. Conversely, it may be that making a life only comes from guitar building. If you are having trouble finding your sweet spot, keep looking so you can keep the passion alive.
Anyone over the age of 40 owns or will soon own a pair of glasses. And, based on a survey of guitar building visitors to the O’Brien Guitars website, that means most of you. The medical term is “presbyopia”. In real life, we call it “I can’t see so close, anymore.”

The GOOD solution in America is to head over to Costco and buy a 3 pack of reading classes. (Where do you shop in Brazil, Australia and Spain?) BETTER is to go to a good hardware store and buy a pair of safety glasses with bifocal magnification. (It only took me a year to get Robbie to buy some. “Wow!”) BEST is to pick up a pair of serious magnifying flip-up glasses like I wear. Mine are OptiVISOR . Yes, the LED lights in front do help, even if they make you look like an alien from “Close Encounters of the Third Kind”. (That’s an over-50 cult movie experience, kids.)
At first, you will be amazed by the clarity of what you see. Next, you will wonder what took you so long to buy some magnification. (It does sneak up on you.) Third will be noticing how big your mistakes are. But, finally, you will appreciate how much easier imperfections are to fix, and prevent. Much of building, in general, will be easier.
Magnification is usually measured in “diopters”. You’ll see 1.25, 1.50, 1.75, 2.00, etc. on the various packages of glasses. OptiVISOR lenses come in 2-5, 7, and 10. Here are some important things to know about magnification:
I have a set of 2 and 4 diopter OptiVISOR lenses. I don’t think I’d want any higher power. I find 4 diopters plenty adequate for seeing really fine lutherie work. I tried the OptiVisor “Visor Light”, but didn’t like it. The beam is too narrow for my taste. I like the light attachment made with LEDs, sold by StewMac . I haven’t found it anywhere else. The visor and lenses can be found at StewMac and on Amazon .
Finally magnification isn’t just for aging eyes. Even if you are younger, you may want to give it a try.