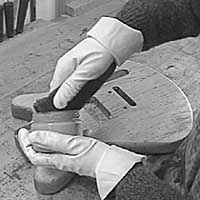
| Encyclopedia --> Making --> Varnishing |
Varnishing and Finishing
Dyes
Can I stain/dye my instrument with clothing dye, food dye or any other kind of stain or dye not originally intended for use on wood? We strongly recommend against using any dye or stain that is not sold specifically for use on wood. While it may look good at first, you don't know how it will hold up and whether or not your deep forest green will fade to a sickly yellow over time.
Can I leave my instrument, or just the neck, unfinished?
No. Finish is absolutely necessary to protect the wood, and without it the wood will quickly become dirty from handling. If you're concerned about the "sticky" feeling of a neck finished with lacquer, many of our customers report that using a tung-oil based finish gives them a "fast" neck.
How to finish a musical instrument quickly and easily, with a minimum of preparation
The short answer is, "You can't." You'll get out of a finish what you put into it. Surface preparation is all-important, equally so for clear and painted finishes. Some finishes, such as wipe-on oil finishes, require less work and much less dust control than sprayed lacquers, but they're not appropriate to all instruments.
Nitrocellulose lacquer
While nitrocellulose lacquer has become "traditional" and a mirror-like lacquer finish is the standard, there are many other finish options including waterbased/waterborne lacquers, French polish/shellac, varnish, and various oil-based finishes like Tru Oil.
Don't be afraid of using a finish that doesn't look exactly like nitrocellulose lacquer, but be aware of possible problems when using oil-based finishes on tropical woods.
Lacquer fumes are extremely noxious, and a sensitizer. Not only is exposure very bad for you and anyone else living in your house, but you can become so sensitive to lacquer that you will no longer be able to use it. If you don't have a safe method for isolating the fumes from both your living space and your workspace, that is an homologated spray booth, you should use some less noxious finish like waterborne lacquer or French polish or varnish. And always protect your lungs from overspray by wearing a good respirator. Inhaled mist will harden in your lungs, and this is never a good thing no matter how "non-toxic" the finish is.
Oil-based finish in tropical woods
The oils in many tropical woods inhibit the chemical processes in oil-based finishes, including varnishes and urethanes, that allow them to cure. If you're working with any kind of tropical wood, test your oil-based finish on a piece of scrap first to make sure it will dry. If it doesn't you can either switch to a finish that dries by evaporation (lacquer, shellac, French polish), or use an evaporative finish as a sealer under your oil-based finish. Be sure to test your sealer-under-oil finish on scrap, too!
French polish from a conservator's point of view: Some ideas for a better coating. by Craig Deller, The Deller Conservation Group, Ltd. Geneva, Illinois
This poster brings some new ideas in maintaining the tradition of French polishing while introducing modern materials that will hopefully prolong the life of the film forming materials and improve its workability.
The technique of French polish has been around since the very late 18th century. Over the years, this traditional application of shellac has changed little. Various recipes can be found in many finishing books that call for a variety of different ingredients that were believed to enhance the qualities of the finish. Studying old recipe books, it became clear that most were concoctions based mostly on hearsay and unfounded boastings of the different materials. Even today, woodworking magazines are publishing articles based on these old recipes and flawed concepts.
Furniture conservators continue to use the French polish technique as it historically represents the correct interpretation of visual appearance of certain types of furniture.
As furniture conservation matures, a more detailed look has been taken at the individual resins used in early varnish making. The resin of coniferous trees (pines) typically known as rosin, was often listed as a key ingredient. Under a variety of different names, (Venice Turpentine, Burgundy Pitch, Colophony, and Elemi,) rosin is now known to degrade rapidly and severely. Linseed oil and other drying and non-drying oils are often listed as ingredients. With its crosslinking capabilities, linseed oil can cause the film to become tenacious and darken. Plus, such incompatible materials as oils, rosins and even gum Arabic, can lead to an internal breakdown within the film itself.
Shellac, the key ingredient in French polish is a very versatile and desirable natural resin. It is the addition of all the cheaper incompatible resins in the recipes that caused concern.
After years of following the old writings, and several failures based on those writings, I attempted to create a more stable, and acceptable coating for historic furniture, plus keeping the visual beauty of traditional French polish. I began to eliminate those cheaper resins prone to rapid degradation that have always been listed in the traditional literature as important ingredients. I also wished to create a clear polish, which meant I needed to eliminate the naturally occurring wax in the shellac. (The wax tends to cloud the polish). While there are commercially available shellacs that have the wax already removed, they tend to be chemically processed to the point of instability, most notable the white, bleached or “blond” shellacs. I prefer to use button shellac primarily due to the limited amount of processing it has gone through. But the wax serves as a natural plactisizer allowing the brittle shellac resin to remain somewhat flexible. With the wax eliminated, I needed to replace the wax’s placticizing effects with another material. Among the softer plant resins I have looked into are Manila Copal, Benzoin, sandarac, damar, mastic and others. I have chosen benzoin and the Manila copal based on traditional successes of these resins and the pleasant odor the benzoin imparts.
However, they are added in small quantities in relation to the shellac.
Typically, for a 750-ml solution, I grind two and a half (2.5) ounces of the button shellac, and .25 oz of the benzoin and .25 oz of the copal. I also prefer to use 95% ethanol (grain alcohol) as opposed to denatured . It may be my imagination, but I do notice a difference between the two alcohols as I use the polish. All of this is warmed in an ultra sonic bath (the temp of the water jacket will reach 100 degree) which accelerates the time the resins will go into solution. Once in solution, the wax and debris are filtered out using a medium fast filter cone. Because the solution is warm when first filtered, some wax will pass through. I will filter a second time for the desired clear polish. I do use a semi- closed filtering system, which reduces the amount of water the warm ethanol will absorb. Now that I had a “clean” traditional recipe for the polish, I began to experiment with adding a higher molecular weight synthetic resin.
I added .5 oz of B-72 and immediately noticed an improved workability of the polish. The grain filling properties and lack of shrinkage caused by the presence of the B-72 made the polish quicker to use. Plus the added benefit of such a stable material as the ethyl methacrylate copolymer, makes this polish warrant further investigation. I also experimented with B-67 (isobutyl methacrylate polymer), often listed a varnish resin, but I found that B-67 made the polish drag and stick as it was being padded out. Plus B-67 has a tendency to crosslink.
Now with an improved version of polish, I proceeded to the next step in creating an even more stable surface coating. Ultraviolet damage to furniture coatings has long been a problem, and French polish is no different. The two UV resistant additives in the coatings industry that would best suit my needs were Tinuvin 292, A hindered amine light stabilizer (HALS), and Tinuvin 328, an UV Absorber. The purpose of the 292 is to help prevent the ultraviolet light from breaking down the film itself, the 328 is meant to absorb the UV, preventing it from fading the underlying wood. According to Ciba-Giegy, the manufacturer, they work in a synergistic way. However, the UV absorbing effect of the 328, would also prevent using an ultraviolet lamp to identify the shellac’s orange fluorescence, which is one of the unique and desirable characteristics of shellac. With the 328 eliminated, only 292 is added to the polish in a quantity of 3% to the weight of the total resin content. It should be pointed out that when the polish is filtered, as much as 20% of the weight of the original resin is removed in the form of the wax and debris, which should be accounted for when the Tinuvin is measured out.
This method of preparing French polish has only been in use for a short period (just a few years) and is subject to further investigation and research. It is my intention with this poster to spark debate and improvements.
From buildyourguitar.com
A well-applied brushed finish is arguably better than a badly-applied sprayed one. Unless you use cans, spraying a guitar always requires a lot of preparation, a suitable room and expensive equipment. You should really seriously ask yourself if a brushed finish wouldn't also meet your own personal demands, especially because they require far less in the way of preparation and are also much cheaper. For only a small part of the money you would otherwise have to spend on spraying equipment you can already buy the best brushes available on the market. I consider brushed-on varnish to be a very good alternative to spraying lacquer.
Varnish is difficult to spray and is therefore mostly applied by brush. It is far more durable than a pure oil finish. Bar-room tables, for instance, are varnish-finished.
Varnish is basically oil that has been cooked with natural resins such as rosin, amber or copal. Depending on the oil-to-resin ratio the results will be harder or softer. This is how, for example, violin varnish is produced. Nowadays polyurethane is commonly used in place of natural resins. Varnish also cures coat by coat and does not bond with coats applied underneath. Since it takes a long time to cure, an absolutely dust-free environment is essential. There are special brushes with bristles forming a tapered, chisel-edged end which are particularly suited for applying varnish.
Use turpentine for thinning natural resin varnishes. Mineral spirits, which are made from petroleum, are often not even suitable for cleaning brushes.
All coats of varnish, apart from the first, should be applied v-e-e-ry slowly and should rather flow off the brush than actually be brushed on. If you are interested in a demonstration of how to correctly apply varnish, I can recommend the video Hand-Applied Finishes: Applying Top Coats by Jeff Jewitt and also the bookHand-Applied Finishes by the same author.
By thinning varnish with mineral spirits or turpentine you get what is called "wiping varnish", which is easy to apply with a cloth.
Excerpt from my book Building Electric Guitars
Order the book "Hand-Applied Finishes" by Jeff Jewitt
A thin coat of wax can, but does not necessarily have to, be applied after the wood has been oiled. Applying such a coat results in better protection and a satin surface that feels very smooth. Regular rewaxing will be required, especially around the neck. Fortunately, this is not a difficult job at all, and it ought to be part of the routine maintenance and care of your instrument anyway. Pure beeswax or any commercially available paste wax are suitable for use on guitars.
Lightly wet the oiled surface with lacquer thinner or mineral spirits. Then dip a folded-up piece of 0000 steel wool or a synthetic alternative such as 3M's ScotchBrite into paste wax and rub it evenly onto the surface, pressing only lightly to avoid rubbing open the thin, hardened topcoat of oil. By roughening up the surface with steel wool the surface is made larger so that the wax coat bonds to it better. After applying the wax use a clean cloth to polish the surface to a flat sheen. If too much wax has been applied, the surface will become sticky and everything but a wafer-thin layer will have to be polished off.
Excerpt from my book Building Electric Guitars
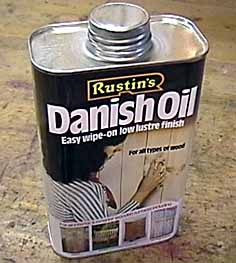
Finishing the body and the neck with Danish Oil saves time, gives good results and can therefore only be recommended. Danish Oil is an oil-varnish blend. It cures to a satin sheen and is much more protective than boiled linseed oil while being just as easy to apply.
Instead of buying Danish Oil you can make your own by mixing one part of varnish, one part of boiled linseed oil and one part of mineral spirits. It's always a good idea to pour varnish and oil through a paint strainer to remove impurities and undissolved residue.
Preparation
By gently wiping the surface with special cloths even very fine dust particles can be removed. Such useful, slightly adhesive cloths are available wrapped in foil from paint stores.
First and second coat
Apply plenty of oil with a cloth, wipe off the excess after about 10 minutes and then allow to dry for several hours or overnight. Store the oily rag in an airtight closed container in between.
Third coat
Apply the oil and sand the wood while still wet (from the oil) with 320-grit wet/dry paper; wipe off any excess oil after 10 minutes and leave to dry for 24 hours.
After finishing dry the oily rag out-of-doors (when wet it can self-ignite!) before you throw it away.
Order a can of "Danish Oil" atrockler.com