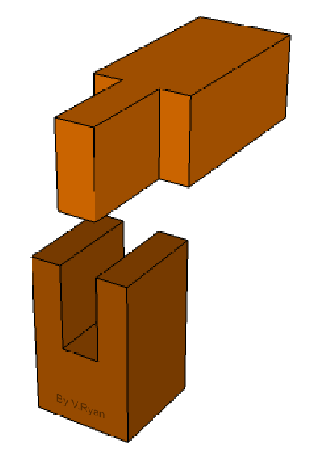
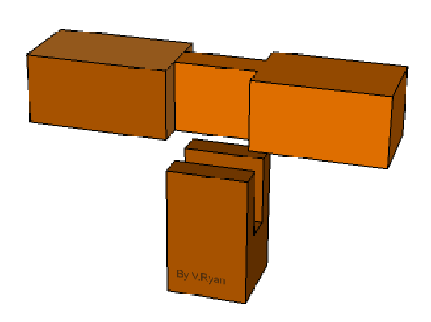
Cross halving joints are probably
the most simple of joints to mark out and cut. They are used whenever it
is necessary to join two pieces of wood that cross over each other.
Sometimes these joints can be seen on the strengthening rails of tables
and chairs.
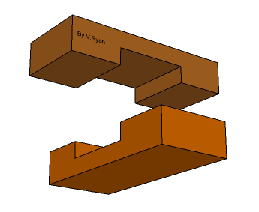
The animation below is a good example of ‘Halved
Joint’. In this type of joint one piece crosses over the other part. If
you look closely you can easily see that a part of each piece of wood has
been cut away so that they both fit together when they are finally glued
together. Notice there are different names for each halving joint.
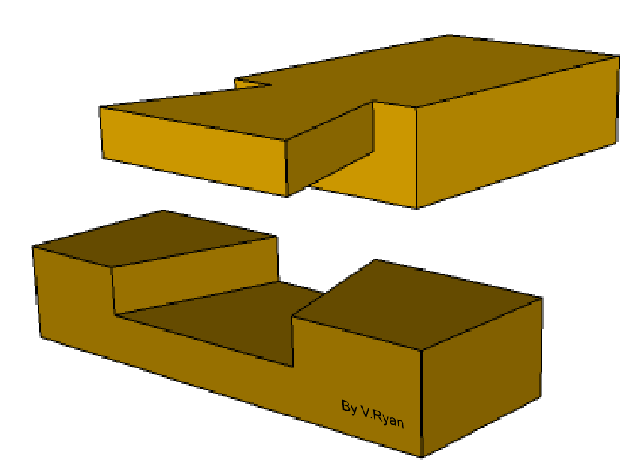
A range of halving joints exist to suit different
designs. For instance, the dovetail halving joint shown below can be used
where great strength is required. A joint such as this is very difficult
to pull apart because of the dovetail shape of one of the pieces. However,
marking out and cutting the dovetail halving joint is much more difficult
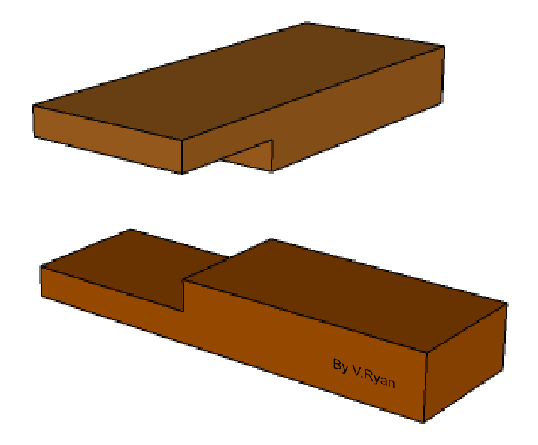
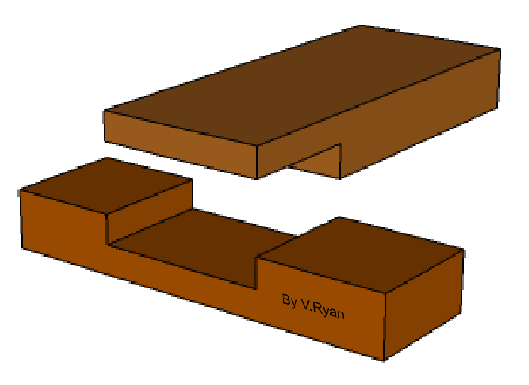
than a simple tee halving. The tee halving and half lap joints can be used
where great strength is not required, they are also much easier to mark
out and cut.
These two ‘BRIDLE JOINTS’
are used when a light frame is needed and strength is not the main
requirement. For example, a picture frame. One part of the joint fits into
the other part and is glued permanently in position. The angled bridle
joint can be used a a substitute for a mortise and tenon joint, again if
strength is not important.
One of the most common joints used for joining the
rails and legs of tables, chairs and other type of furniture is the
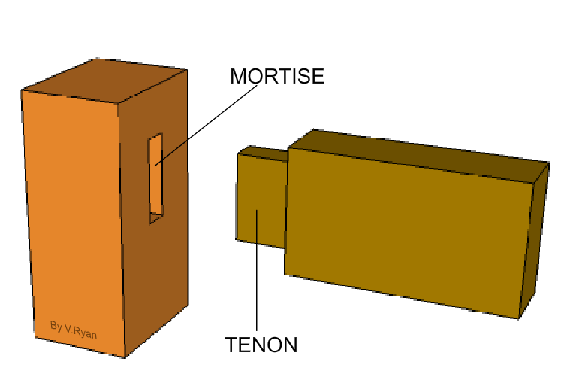
Mortise and Tenon joint. A large range of mortise and tenon joints exist
and the most simple of these is shown below.
THE PLAIN MORTISE AND TENON
JOINT
The tenon is the part that fits into the mortise. A
glue such as PVA or cascamite is applied before the joint is pushed
together. Clamps are used to hold the joint firmly together, usually for
twenty four hours. This type of joint could be used to join the legs and
rails of a table together because they are strong effective permanent
joints. If a good glue such as PVA or Cascamite is used the joint would be
very unlikely to break apart.
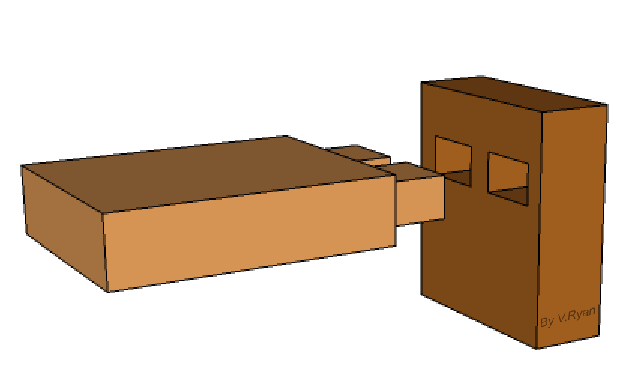
Below are two examples of ‘MORTISE
AND TENON JOINTS’. These are used when making tables or cabinets
and they are very strong when glued together with either PVA or
cascamiteadhesives.There are many different
types of mortise and tenon joints.
The Plain
Mortise and Tenon joint (shown below) is very common and is widely used
for the joints of tables. Although it is quite strong, if enough force is
placed on the joint it will eventually break or come lose.
On the
other hand, the Wedged Mortise and Tenon joint is extremely strong because
the tenon passes all the way through the mortise and is wedged at the
other side. However, the Wedged Mortise and Tenon is more difficult to
mark out and cut and requires much more technical skill. If the mortise
and tenon joint is to used as part of a frame a secret or sloping haunch
is used. The tenon does not show on the outer side of the joint and it
gives greater gluing area, adding to the overall strength of the joint.
The sloping haunch of the tenon can be clearly seen on the wedged mortise
and tenon joint shown below.
PLAIN MORTISE AND
TENON
WEDGED MORTISE AND TENON
DOWELLED MORTISE AND TENON
JOINTS
This is another example of a mortise and tenon joint.
However, in this example a piece of dowel rod is drilled through the mortise
and the tenon. This helps keep the joint together even when it is under
great pressure. This is used as a joint on chairs and other pieces of
furniture so that the joints do not break apart when extra weight is
applied. If a joint of this type is cut accurately, glue often is not needed
to hold the parts together. When the dowel rod is 'tapped' into position the
tenon is pulled into the mortise, creating a very tight joint.
Below another way in which dowels can be used to form a
joint. Modern pieces of furniture are often jointed in this way. It is a
permanent method but it is not the strongest joint as the parts can
eventually pull apart, especially as the joint becomes old. However, it is a
quick to do and saves precious time. Modern glues that are very strong have
meant that this joint is often used to quickly fix parts together.
This joint is used for rails for
strengthening tables and chairs. As usual, wood working adhesive such as
PVA or cascamite is used to make the joint permanent
TWIN MORTISE AND TENON
This is a very strong mortise and tenon because the two
tenons give a greater gluing area than a single tenon. It is used where
great strength is required at a joint.
An animation of a plain mortise and tenon joint joint
is shown opposite. This type of joint has a wide range of uses and is
particularly useful when manufacturing furniture. Several types of mortise
and tenon joint exist. (see
joints index page). The marking out and cutting of all the mortise and
tenon joints are based in this simple joint. Below is a stage by stage
account of the marking and cutting of the mortise part of the joint.
The mortise gauge is a special type of marking gauge
and it is used to mark wood so that a mortise can be cut into it. The
diagram to the above represents a typical mortise and tenon joint. The
mortise is marked out using the mortise gauge although it must be set to
the correct size of mortise chisel very carefully. A mortise chisel is
then used to remove the waste wood.
The mortise gauge is normally made from a hardwood such as rose wood with
brass being used for the parts that slide along the stem.
MARKING OUT THE MORTISE
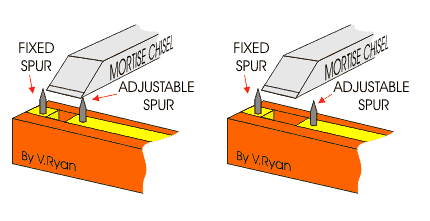
1. The distance
between the fixed spur and the adjustable spur is set so that it matches the
width of the mortise chisel. The width of the mortise chisel should match
the width of the mortise to be cut in the wood.
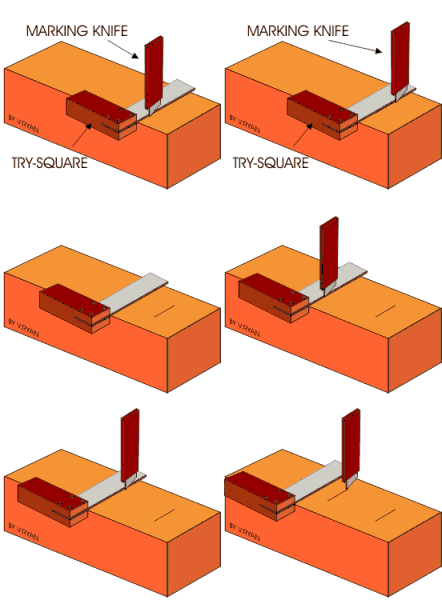
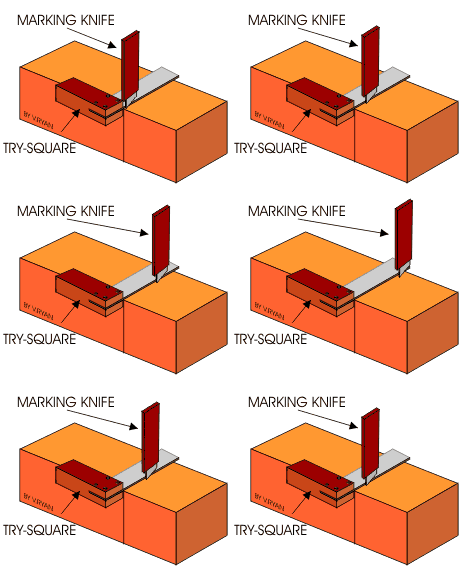
2. A try square and a
marking knife are used mark the lines at the top and bottom of the mortise.
3. The stock of the
mortise gauge is pressed against the side of the wood. It is then pushed
along the wood until the mortise is marked out correctly.
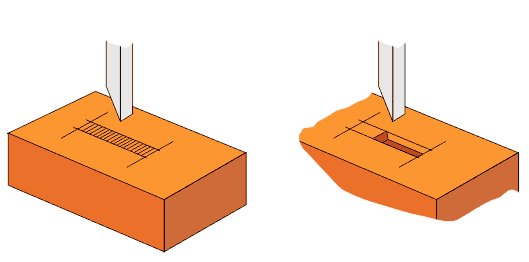
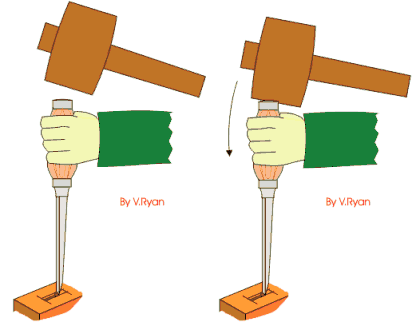
4. The mortise
chisel is then used to break the surface of the waste wood by gently
tapping the handle with a mallet.
5. The waste
wood is then slowly removed, this time, by applying more force to the
handle of the chisel with the mallet. The waste is removed until the
entire mortise hole has been cut.
The tenon part of a mortise and tenon joint is marked
out and cut with the same tools as are used for the mortise part of the
joint.
The mortise chisel is carefully selected. It should be
the same width as the mortise to be cut into the wood. The fixed spur and
the adjustable spur of the gauge are set to the width of the chisel.
The width of the tenon is marked all the way round the
wood. Normally a marking knife is used to produce a precise line, with the
aid of a try square. A pencil can then be used make the line stand out.
The mortise gauge is used to mark the size of the
tenon. The stock of the marking gauge must be held firmly against the side
of the wood as wit ill have a tendency to follow the grain of the wood
rather than a straight line.
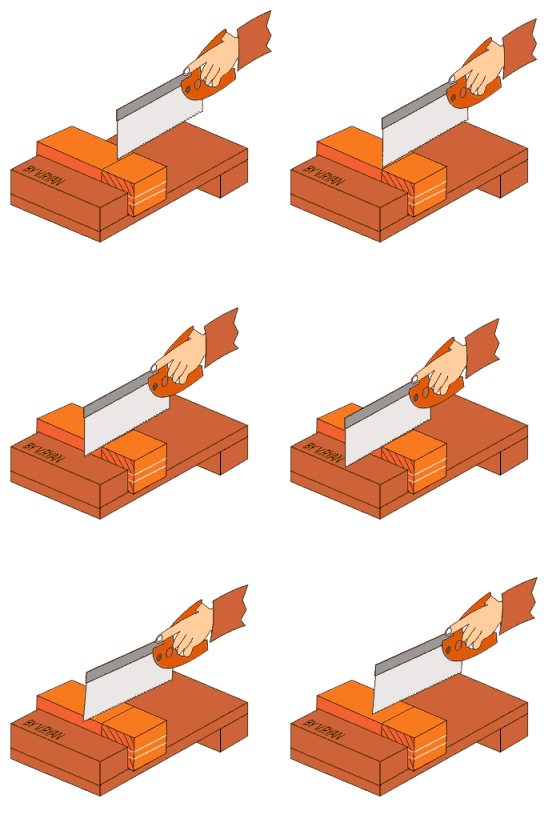
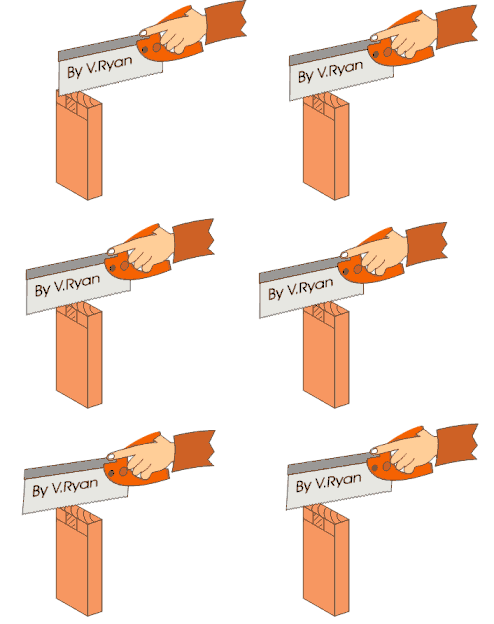
A tenon saw is used saw down the gauged lines of the
tenon. The wood is normally held firmly in a woodworkers vice. When sawing,
take time to check that the saw is cutting straight down and that it is on
the waste wood side of the tenon.
The wood is then supported by a bench hook and a tenon
saw is used to finally remove the waste wood. This leaves the shoulder of
the joint.
A firmer or bevel edged chisel can be used to remove
rough edges and to straighten the tenon. The wood must always be held in a
woodworking vice as a chisel my slip if the wood moves. If the marking out
and cutting have been carried out accurately the mortise and tenon should
fit together forming a firm joint.
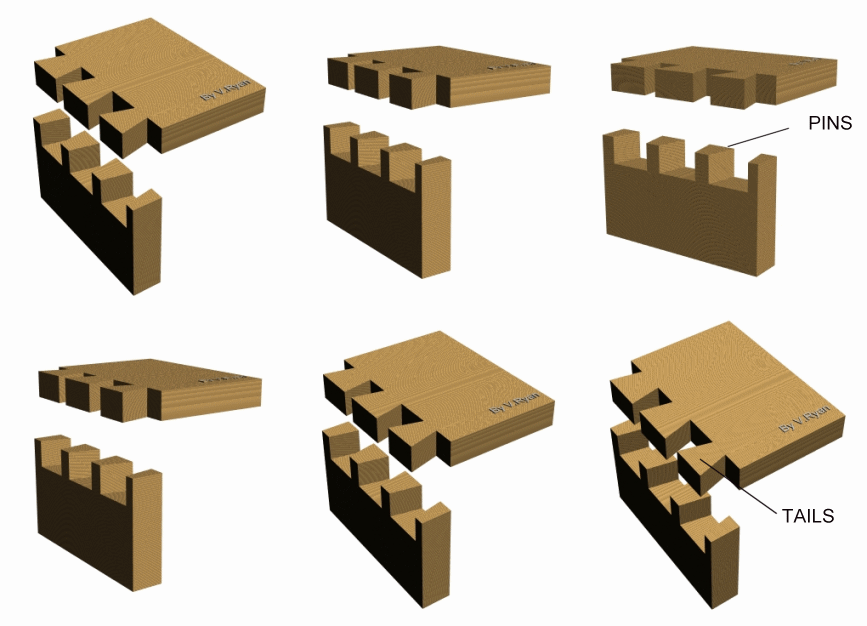
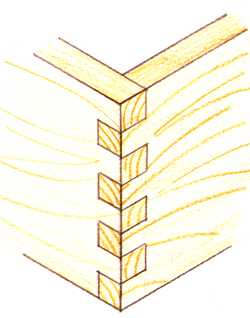
The ‘DOVETAIL JOINT’ is very strong because of the way
the ‘tails’ and ‘pins’ are shaped. This makes it difficult to pull the
joint apart and virtually impossible when glue is added. This type of
joint is used in box constructions such as draws, jewellery boxes,
cabinets and other pieces of furniture where strength is required. It is a
difficult joint which requires practice. There are different types of
dovetail joint and when cut accurately they are very impressive and
attractive.
EXAMPLE OF A SIMPLE
DOVETAIL JOINT AS PART OF A 'BOX' CONSTRUCTION
The Lapped Dovetail Joint
This type of dovetail joint is often used for drawers
where the joint can only be seen from one side. The joint is very strong as
are all dovetail joints. This type of joint is sometimes used as the joint
for book cases and cabinets.
The ‘DOVETAIL JOINT’ is very strong because of the way
the ‘tails’ and ‘pins’ are shaped. This makes it difficult to pull the
joint apart and virtually impossible when glue is added. This type of
joint is used in box constructions such as draws, jewellery boxes,
cabinets and other pieces of furniture where strength is required. It is a
difficult joint which requires practice. There are different types of
dovetail joint and when cut accurately they are very impressive and
attractive. The joint is strong especially when used with a good quality
glue such as PVA (woodworkers adhesive) or cascamite. The marking out and
cutting procedure is outlined below.
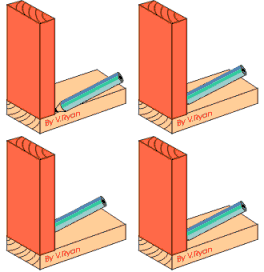
1. The two sides to
be jointed are arranged as shown in the diagram. A pencil is used to mark
the thickness of the material.
2. A marking knife
and a try square are used to mark all the way round the material. It is
possible to use only a pencil but a marking knife is more precise and it
has the advantage of cutting the wood fibres. This means when a saw is
used to cut the joint the surface of the wood is less likely to split.
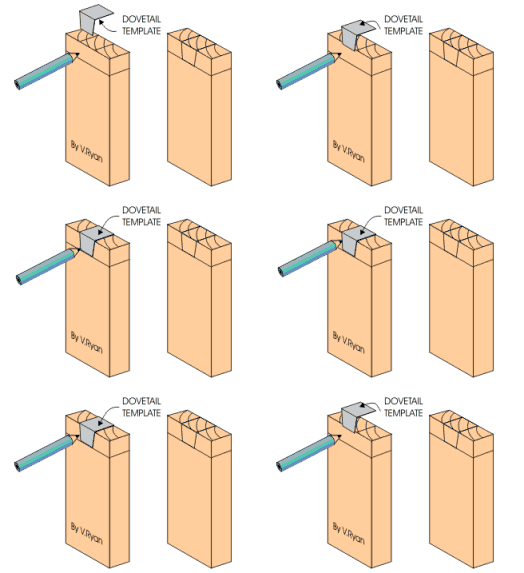
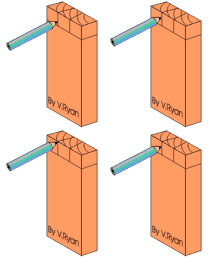
3. A dovetail
template is used to mark out the dovetail. A sliding bevel can be used
also by setting it to the required dovetail angle. The waste wood should
be shaded with a pencil. This will help you avoid cutting away the wrong
part of the joint.
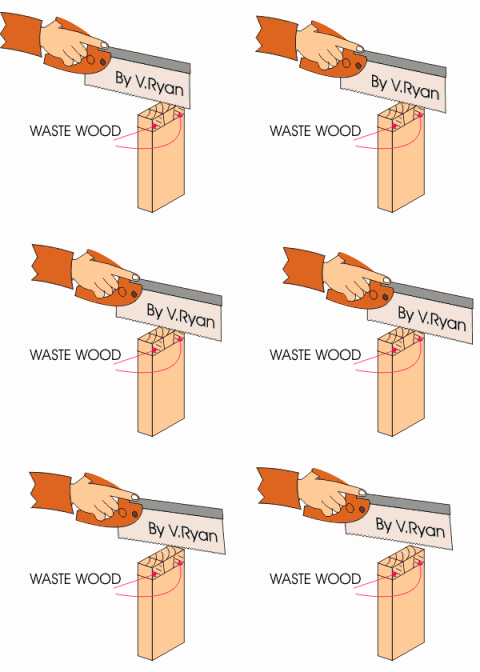
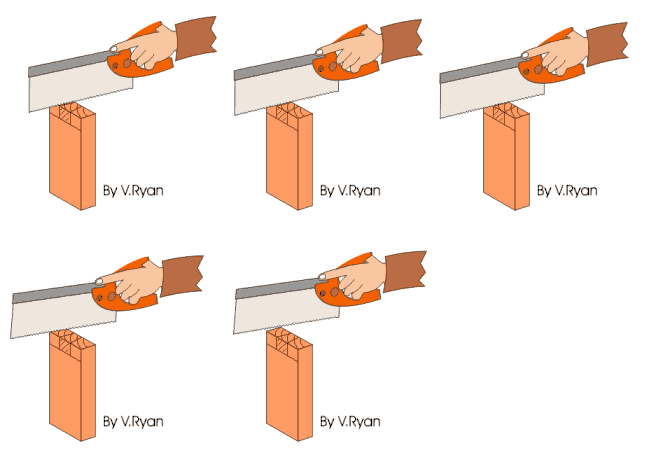
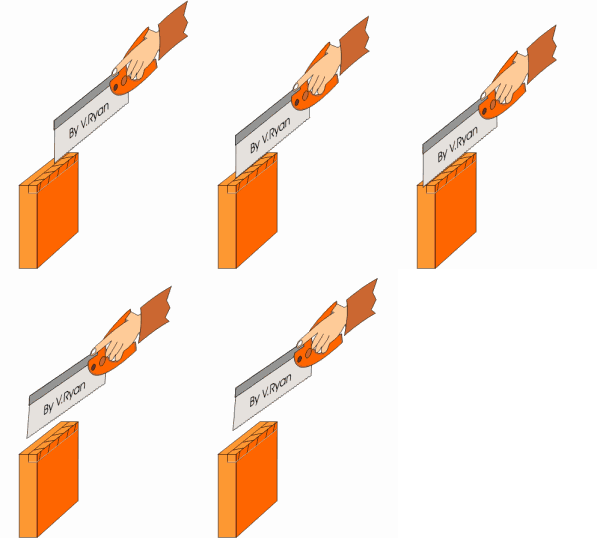
4. The wood is
placed in a vice. It must be vertical so that the dovetail or tenon saw is
always cutting down in a straight line. Avoid putting the wood in the vice
at an angle as it will be virtually impossible to use the saw accurately.
When cutting it is important to cut on the waste wood side of the line. It
should be possible to see the marking out lines after the saw has been
used.
5. The wood is then
turned sideways in a vice and the waste material is finally removed using
a dovetail or tenon saw.
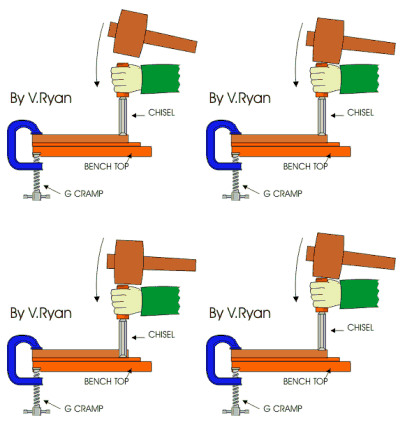
6. If the tail is
slightly inaccurate a firmer or bevel edged chisel can be used to correct
it. A G cramp is used to hold the wood firmly. Scrap wood is placed
underneath to protect the surface of the bench from the chisel. The first
side of the joint should now be complete.
7. The first side
is placed above the second side of the joint and the pins are marked out.
Again a pencil is used although the traditional tool would be a marking
knife.
8. Marking out the
joint when both pieces are together can be difficult but a steel ruler or
a try square can be used to straighten any lines. Again, the waste wood
must be clearly identified.
9. A dovetail /
tenon saw is used to cut down the lines marking the pins. The wood must be
secured in the vice in the same way as before. Remember, the saw is used
to cut straight down the joint, on the waste side of the pencil line.
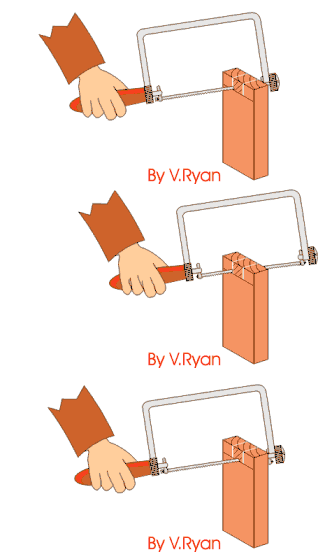
10. A coping saw is
used to remove the waste wood. Again the wood is secured in the vice.
11. A chisel is
used to finish the joint, if it is needed. The wood is placed in a
woodworkers vice so that it cannot slip. The joint should fit together if
care has been taken when marking out and cutting the two sides.
12. If the pin is
slightly inaccurate a firmer or bevel edged chisel can be used to correct
it. A G cramp is used to hold the wood firmly. Scrap wood is placed
underneath to protect the surface of the bench from the chisel. The second
side of the joint should now be complete.
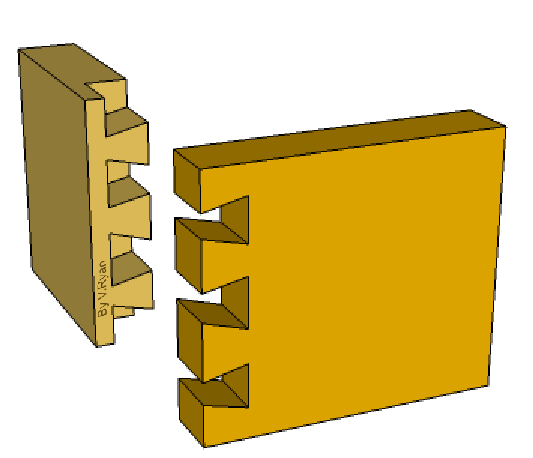
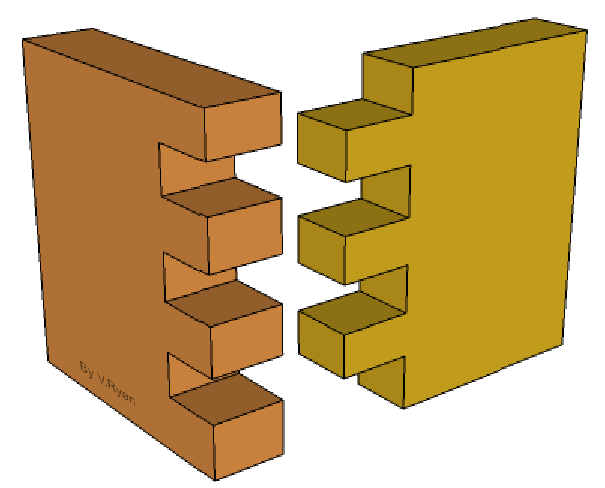
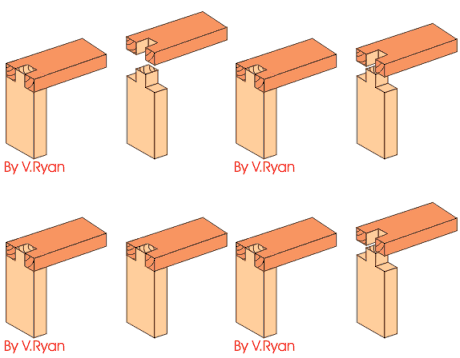
This a good example of a ‘finger’ or ‘comb’ joint. It
is ideal for box constructions and is suitable for use with natural woods
such as pine and mahogany or even manmade boards such as plywood and MDF.
The joint is strong especially when used with a good quality glue such as
PVA (woodworkers adhesive) or cascamite.
If the joint is cut accurately the ‘fingers should fit
together without any gaps and the glue ensures that they are virtually
indestructible. They are used for a wide range of products including
jewellery boxes, cabinet construction, kitchen cupboards and many others.
(Example below - a box containing an electronic game for a young child -
notice the finger joints)
Here we see a finger joint before it is glued together.
The fingers are lined up with each other and they should slide together,
rather like the fingers on you right and left hand when you interlock
them. Try forcing you hands apart when they are interlocked - you will
find this difficult to do.
This a good example of a ‘finger’ or ‘comb’ joint. It
is ideal for box constructions and is suitable for use with natural woods
such as pine and mahogany or even manmade boards such as plywood and MDF.
The joint is strong especially when used with a good quality glue such as
PVA (woodworkers adhesive) or cascamite. The marking out and cutting
procedure is outlined below.
1. The two sides to
be jointed are arranged as shown in the diagram. A pencil is used to mark
the thickness of the material.
2. A marking knife
and a try square are used to mark all the way round the material. It is
possible to use only a pencil but a marking knife is more precise and it
has the advantage of cutting the wood fibres. This means when a saw is
used to cut the joint the surface of the wood is less likely to split.
3. The fingers of
the first joint are marked out using a pencil and a try square/steel
ruler. The traditional way of marking the fingers involves the use of a
marking gauge. Using a marking
gauge to mark the fingers is difficult especially if you have not used
this type of tool before. The waste wood should be shaded with a pencil.
This will help you avoid cutting away the wrong part of the joint.
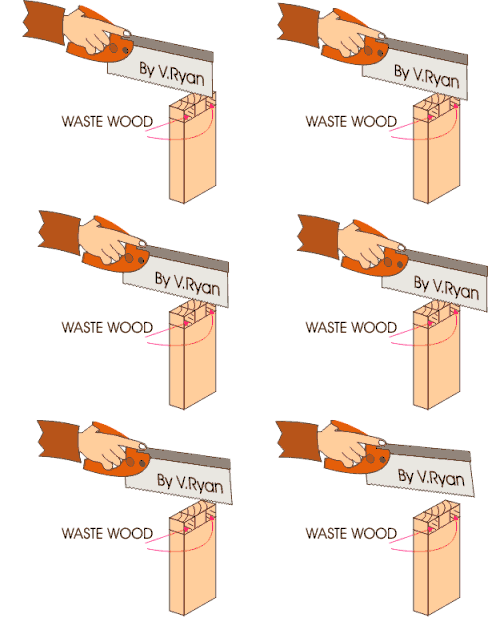
4. The wood is
placed in a vice. It must be vertical so that the tenon saw is always
cutting down in a straight line. Avoid putting the wood in the vice at an
angle as it will be virtually impossible to use the saw accurately. When
cutting it is important to cut on the waste wood side of the line. It
should be possible to see the marking out lines after the saw has been
used.
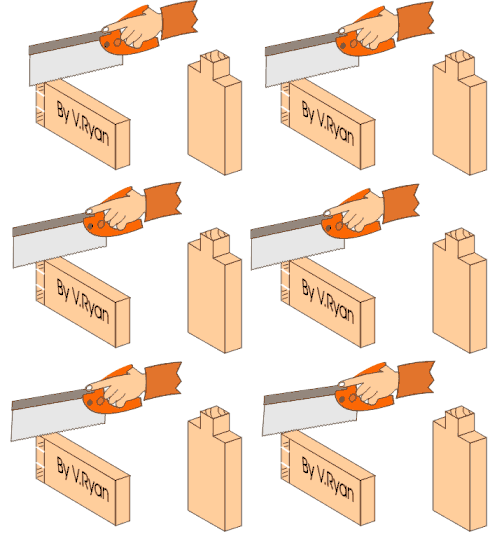
5. The wood is then
turned sideways in a vice and the waste material is finally removed using
a tenon saw.
6. If the joint is
slightly inaccurate a firmer or
bevel edged chisel can be used to correct it. A G cramp is used to
hold the wood firmly. Scrap wood is placed underneath to protect the
surface of the bench from the chisel. The first side of the joint should
now be complete.
7. The first side
is placed above the second side of the joint and the joint is marked out.
Again a pencil is used although the traditional tool would be a marking
knife.
8. Marking out the
joint when both pieces are together can be difficult but a steel ruler or
a try square can be used to straighten any lines. Again, the waste wood
must be clearly identified.
9. The tenon saw is
used to cut down the lines marking the middle section of the joint. The
wood must be secured in the vice in the same way as before. Remember, the
saw is used to cut straight down the joint, on the waste side of the
pencil line.
14. A coping saw is
used to remove the waste wood. Again the wood is secured in the vice.
15. If the joint is
slightly inaccurate a firmer or bevel edged chisel can be used to correct
it. A G cramp is used to hold the wood firmly. Scrap wood is placed
underneath to protect the surface of the bench from the chisel. The second
side of the joint should now be complete.
The joint should fit together accurately. If the stages
outlined above have been carried out carefully.
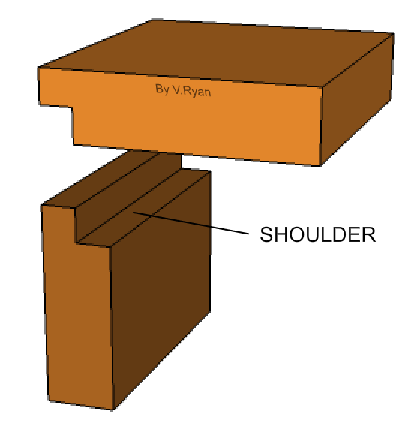
The shoulder or lapped joint is very common and is used
for furniture and box constructions such as jewellery boxes.
The joint to above is a simple lapped joint. The shoulder
can be seen clearly, this is usually planed using a rebate/shoulder plane or
combination plane. This type of joint is often seen as a corner joint.
The jewellery box seen below has a base which sits inside
a rebate or shoulder which has been planed / cut into each of the sides. The
base has been pushed into the shoulder and this means it is level with the
sides.
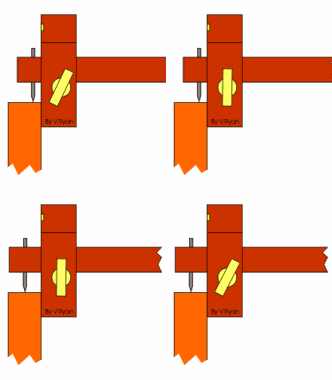
A marking gauge is set to half the thickness of the
material to be used for the lapped joint.
The marking gauge is used to produce a line across the
end of a piece of wood and down the sides a little. This can be difficult
to see, so a pencil can be used to highlight the gauged line.
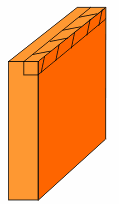
A try square is then used to extend the line across the
side of the wood. The marking out should look like the diagram below when
completed. This shows the area of the joint to be cut away. It is good
practice to shade the waste wood.
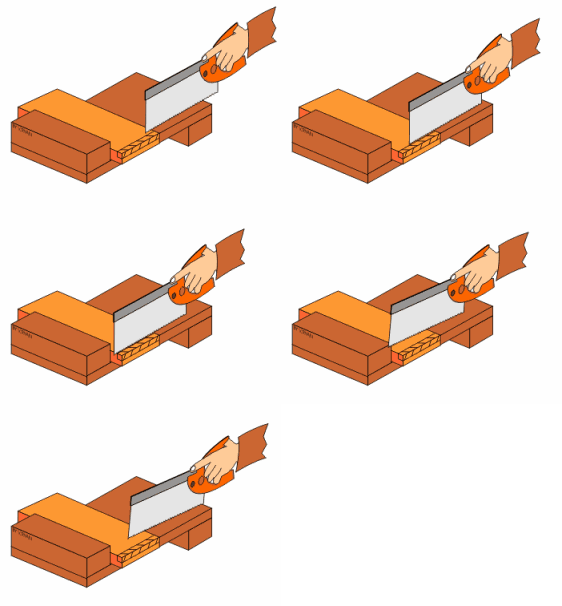
One of the saw cuts can be made using a tenon saw and a
bench hook. Normally the wood is clamped down so that it is less likely to
move during sawing.
The second saw cut is carried out with the wood held
firmly in a vice.
If working in the same direction as the grain of the
wood, a shoulder plane can then be used to finish the joint accurately.
Scrap wood is clamped down on top of the joint and it is used to guide the
plane.
If working across the grain of the wood, a chisel is used
to straighten / clean up the joint. The wood should be G-clamped to the
bench with scrap wood placed underneath. This ensures that the chisel is
less likely to slip. If the chisel does slip then it will not damage the
bench as it will hit the scrap wood.
If a second side of the joint is prepared in exactly the same way, the two
should form an accurate lapped joint.
Knock-down fittings are those that can be put together
easily, normally using only a screw driver, a drill, a mallet/hammer and
other basic tools. They are temporary joints although many are used to
permanently join together items such as cabinets and other pieces of
furniture that are purchased in a flat pack.
PLASTIC CORNER BLOCK (FIXIT
BLOCKS):
The corner block is pressed against the two pieces of
material (normally wood based). Screws are used to fix the block into
position. This type of joint is used to fit modern cabinets such as those
found in a kitchen. It is a relatively strong joint although it has the
advantage that it can be dismantled using a screwdriver.
NATURAL WOOD FITTING (SQUARE
SECTION BATTEN):
A piece of material such as pine can be drilled and
screws can be passed through these holes. This gives a cheap and effective
knock-down joint. The screws are normally countersunk into the knock-down
fitting.
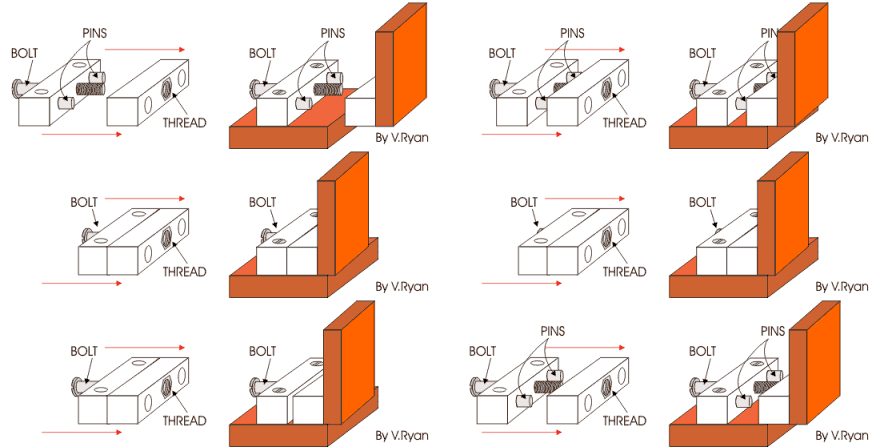
TWO BLOCK FITTING (LOK-JOINTS):
These are made from plastic. A bolt passes through the first fitting into
the thread of the second. As the bolt is tightened it draws the two fittings
together. The pins help keep the fitting straight. This gives a very strong
joint and it can be dismantled using a screwdriver.
RIGID JOINT: These
are normally moulded in plastic which makes them strong. Screws pass through
the four holes which hold the sides at each corner firmly together.
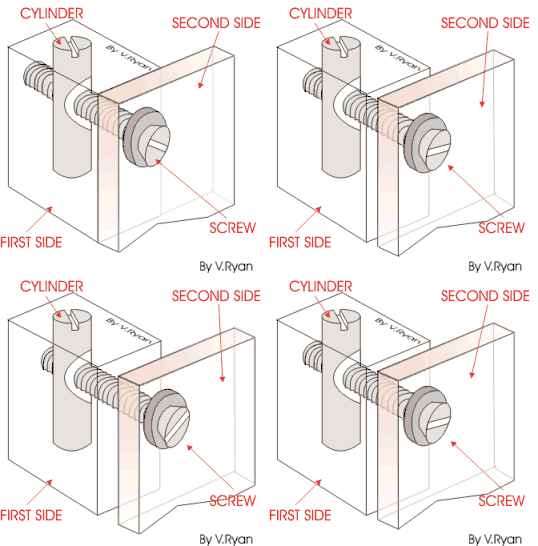
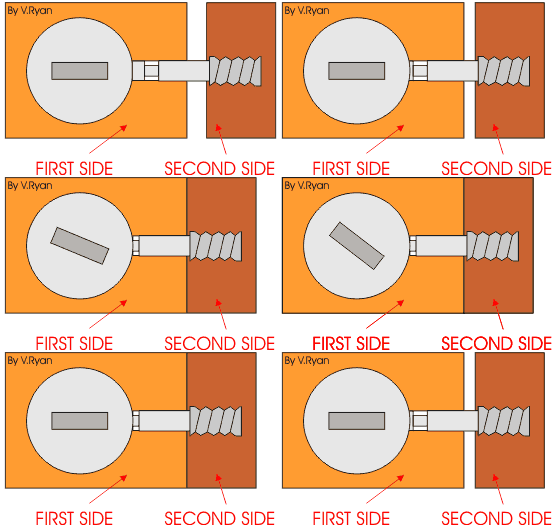
SCAN FITTINGS:
These are strong enough to be either permanent or temporary joints. The
cylinder is inserted into the first side of a cabinet in a pre-drilled
hole. The screw is then pushed through the hole in the second side until
it meets the cylinder. It can then be tightened with a screw driver until
both sides of the cabinet pull together.
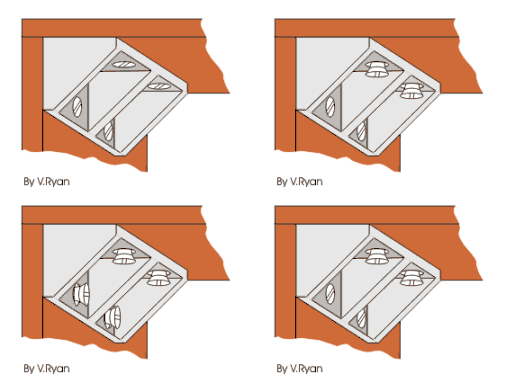
CAM LOCKS: The disk
fits into a recess in the first side of the cabinet. It rotates by inserting
a screwdriver into the slot in its side. The shaft is screwed into the
second side of the cabinet.
The collar of the shaft is passed through the hole in the second slot in the
disk. When the disk rotates the shaft is locked in position. This keeps both
sides of the cabinet locked together.
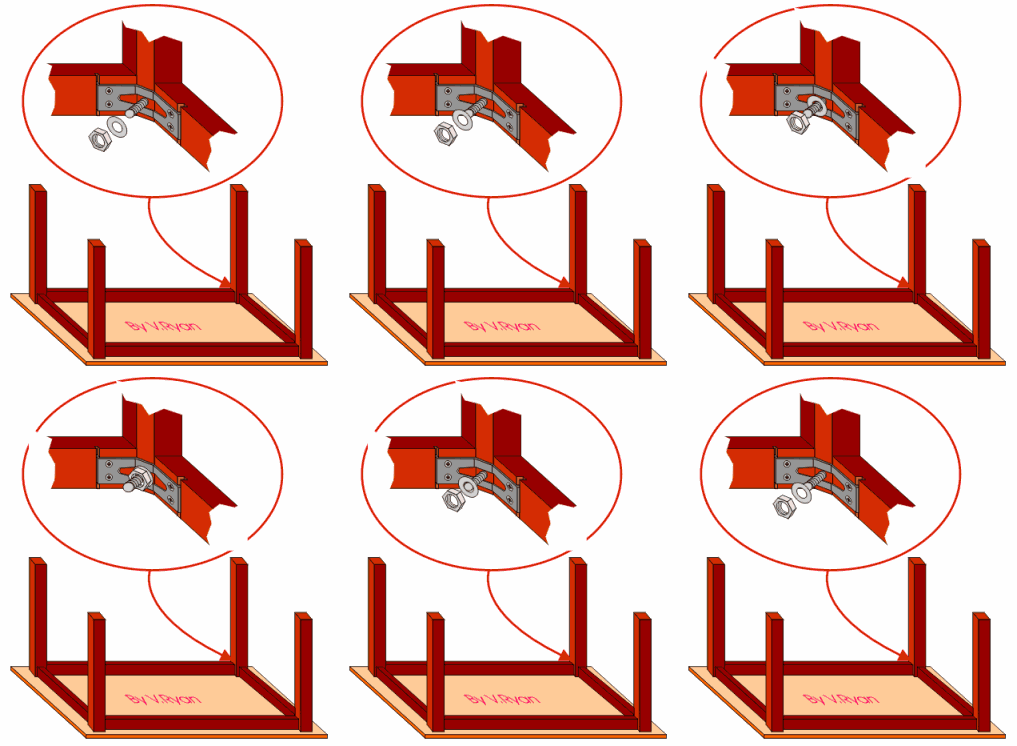
A traditional table is fixed permanently together using
mortise and tenon joints. These joints are strong but have a disadvantage
- they cannot be used for modern ‘knockdown furniture’. Modern furniture
is normally flat-packed, this means it is delivered to the home, in
pieces, arranged in a flat package. It has to be assembled in the home.
Usually instructions are supplied but they can be difficult to follow. The
‘table plate’ fitting is ideal for this type of furniture because it can
be set up quite easily with the use of a spanner and a screw driver.
The diagram below shows a typical table which has been permanently fixed
together using mortise and tenon joints. The highlighted area shows an
alternative way of fixing the parts together, using a table plate.