
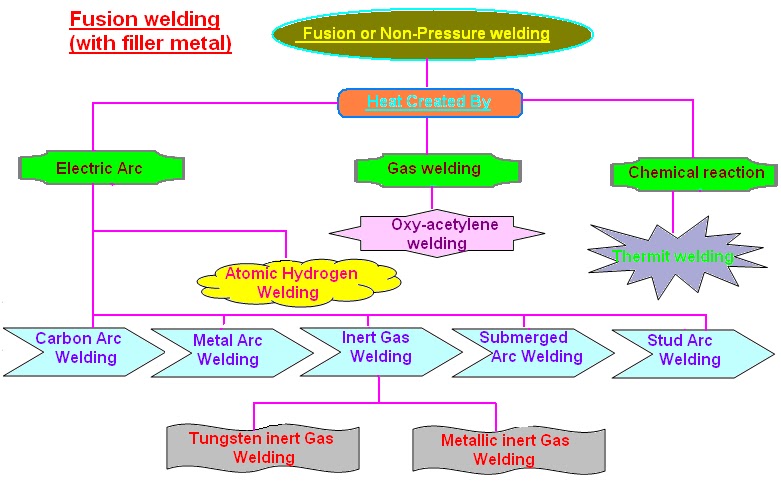
GAS WELDING - OXYACETYLENE
|
Oxyacetylene gas welding is commonly used to
permanently join mild steel. A mixture of oxygen and acetylene, burns as
an intense / focussed flame, at approximately 3,500 degrees centigrade.
When the flame comes in contact with steel, it melts the surface forming a
molten pool, allowing welding to take place. Oxyacetylene can also be used
for brazing, bronze welding, forging / shaping metal and cutting. |
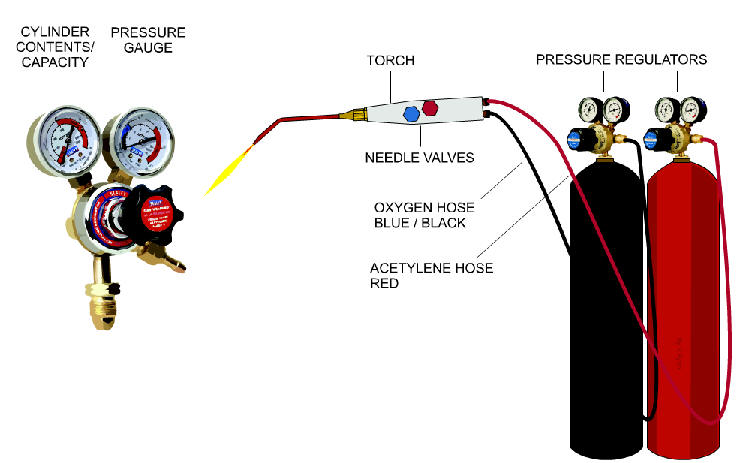 |
| PREPARING THE CYLINDERS FOR WELDING |
| Slowly open the main valve of the acetylene tank and
adjust the acetylene pressure regulator to 5PSI (pounds to square inch). Open the needle valve on the torch and adjust the pressure on the acetylene regulators to show 5PSI. Close the needle valve. Go through the same procedure for the oxygen cylinder. |
| IGNITING THE ACETYLENE / OXYGEN MIXTURE | |
| TURNING ON: Acetylene slowly turned on (quarter/half turn of the needle valve) and ignited, producing a small flame. At this stage, a small amount of soot/smoke is given off the end of the flame. |
|
| Acetylene increased and oxygen turned on slowly. | |
| Acetylene increased slowly and oxygen more rapidly, to produce an intense, localised flame, capable of precise welding. | |
| TURNING OFF: Turn off the oxygen first, followed by the acetylene |
|
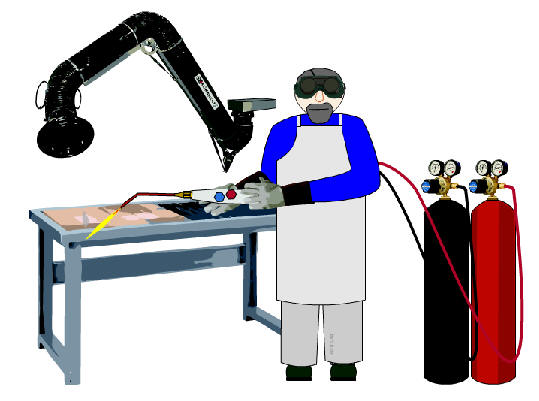
| Welding inevitably means exposure to
extremely high temperatures. For this reason, a leather apron and leather
gloves are essential. Special welding goggles protect the eyes from the potential ‘splatter’ of molten metal during the welding process. They also protect the welders eyes from the dangerous ultraviolet and infrared light waves, produced by light emitted by the intense flame of the torch. The goggles usually have ‘flip up’ lenses. These allow the welder to look through normal lenses when arranging the metals to be welded and the ‘flip down’ tinted lenses when welding. All welding must be carried out in a well ventilated area, as breathing the fumes that are generated during welding, can be dangerous. The welding area should be clear of any potential fire and trip hazards. |
 |
| A welding bench, although not always essential, helps keep welding in a safe area. This type of bench is safe because it will not catch fire and the fire brick area is ideal for welding small items. |
 |
STEEL WELDING PROCEDURE - FLAT PLATES
OXYACETYLENE
| The two steel plates are ‘tacked’ together. This involves welding in two or three places, to hold the plates together. |
 |
| The entire joint is welded, slowly and accurately. The flame is focus at one end of the joint, forming a small pool of molten steel. The welding rod / filler rod is introduced to the flame, as the pool is slowly ‘pushed’ down the entire length of the joint. | |
| The joint is allowed to cool slowly. When cool, the ‘slag’, which forms during the welding process, is tapped away using a welding hammer. The joint can now be inspected for accuracy and strength. |
WELDING STEEL PLATES AT RIGHT ANGLES
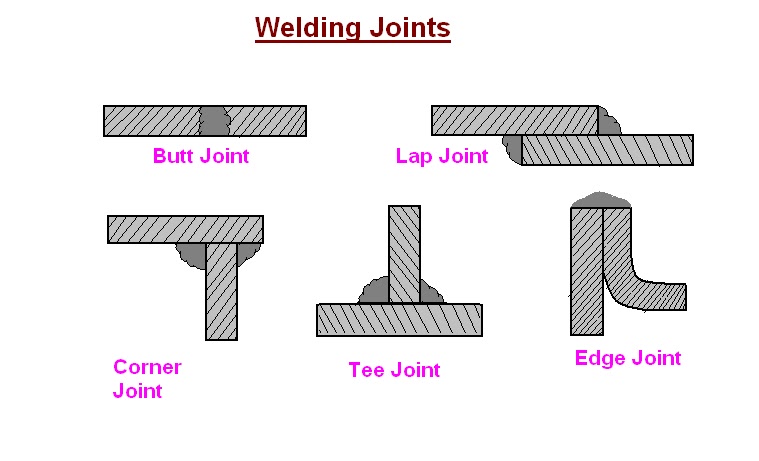
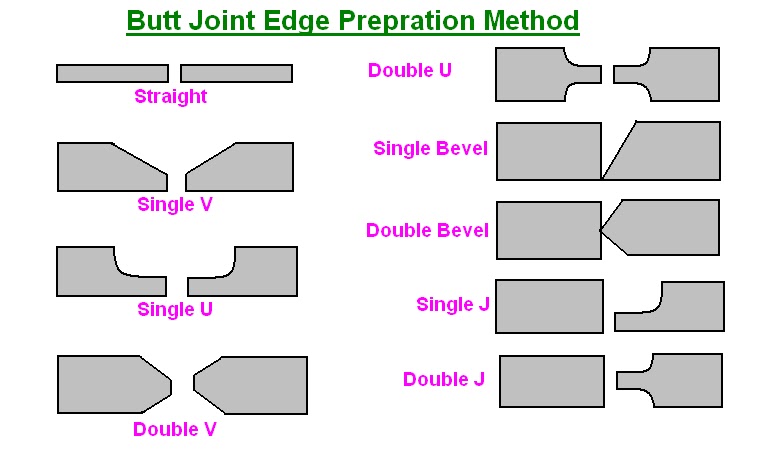
When steel plates are welded together, at an angle of 90 degrees, the edges that meet are ground at 45 degrees. This gives a much stronger joint.
After grinding, the joint is positioned and ‘tacked’ to ensure there is no movement during the welding procedure.
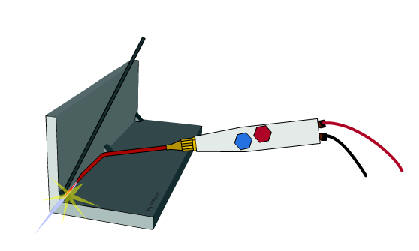
The entire joint is welded. It is allowed to cool slowly. Rapid cooling, such as dipping in cold water will damage the joint and possibly weaken it.
BRAZING WITH OXYACETYLENE
1. Oxyacetylene is often used to produce precise brazed
joints. The two pieces of steel to be brazed, are cleaned with emery cloth,
removing grease and dirt. Flux is applied to the joint. This protects the area
to be brazed, preventing oxidation (oxidation will prevent the ‘solder’ from
flowing along the joint).
2. The area is preheated by holding the torch a small distance from the steel.
This slowly warms up the two surfaces to be joined and evaporates the water in
the flux.
3. The flame is focussed at one end of the joint, raising the temperature of the
steel to ‘red heat’. Brazing rod is fed into the joint . The molten brazing rod
follows the heat of the flame, as the torch proceeds along the joint, until the
brazing is complete.
4.The steel is allowed to cool slowly. When cold, a wire brush is used to clean
the joint, revealing a ‘bronzed’ line of solder, which holds the two pieces of
steel permanently together.

BRAZE WELDING (BRONZE WELDING) AND BRAZING
OXYACETYLENE
|
Oxyacetylene can be used to braze and to braze weld (bronze weld). These techniques are often confused, as they involve the use of the same equipment. |
| Bronze filler rod is an alloy composed of copper and tin. Brass filler rod is also an alloy, composed of copper and zinc. Either rod can be used. |
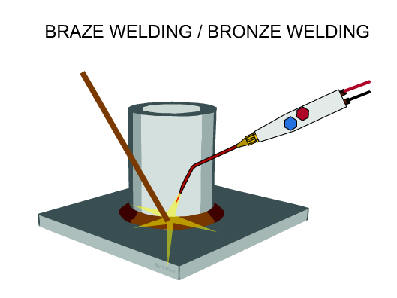
The steel tube and steel plate have been heated to a dull red heat. The
‘bronze’ filler rod (coated with flux) is then introduced to the joint. It flows
onto the two surfaces, forming a ‘fillet’ around the joint, joining the two
surfaces.
Braze / bronze welding provides a strong joint and is ideal of steel frames,
where a certain amount of flexibility is required.
The filler rod is broader than that used in brazing.
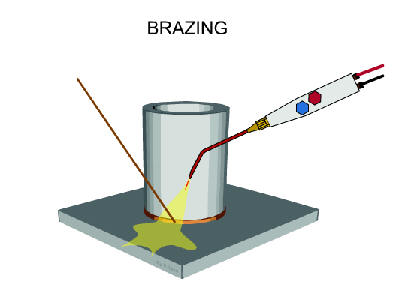
| When brazing, flux is applied to the joint,
to prevent oxidation of the surfaces. The steel tube and plate are heated to
bright red heat and the brazing rod (filler rod) applied to the joint. The
end of the filler rod melts and flows around the joint, through capillary
attraction. This gives a joint that looks like a ‘line’ of bronze. Brazing is ideal for manufacture of bicycle frames, as it does not ‘fracture’ as easily as steel welded joints. |
| Brazing and braze welding (bronze welding), can be used to join similar and also dissimilar metals such as: |
| Mild Steel - Galvanized Steel Stainless Steel - Copper Mild Steel - Stainless Steel Stainless Steel - Copper-Nickel Mild Steel - Cast Iron |
BRAZING USING A BRAZING HEARTH
|
Steel can be joined by using a technique called brazing.
A high temperature is needed for this and so a brazing hearth is normally
used. Brazing gives a permanent joint that is ideal for most metalworking
projects in schools and colleges. In industry this technique is used on
products such as bicycle frames where there is a need for a certain amount
of flexibility in the joint. |
|
|
THE EQUIPMENT |
|
|
|
The brazing Hearth contains a compressor which
pressurises air and gas so that it is forced out the nozzle of a gas-air
torch. As it comes out the nozzle it can be ignited so that it burns
fiercely. If the torch is used correctly it can heat up metals to a high
temperature. This is exactly the type of equipment that is needed for a
brazing joint between two pieces of steel. |
|
|
|
BRAZING A JOINT
V. Ryan © 2002 - 2008
|
|
1. Two pieces of
steel sheet are to be brazed. The steel must first be cleaned so that
grease and dirt is removed. Wire wool or emery cloth are the most suitable
abrasives. |
|
|
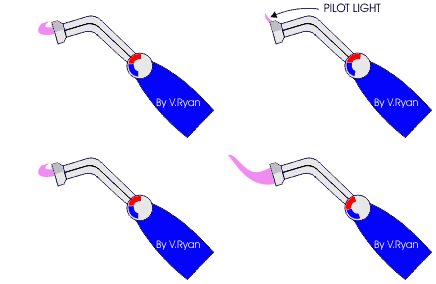
2. The compressor is turned on and this pressurises the gas and air. As the gas-air control is slowly turned on, gas is fed through the nozzle and this is ignited by a pilot light on the nozzle or by a match. |
|
|
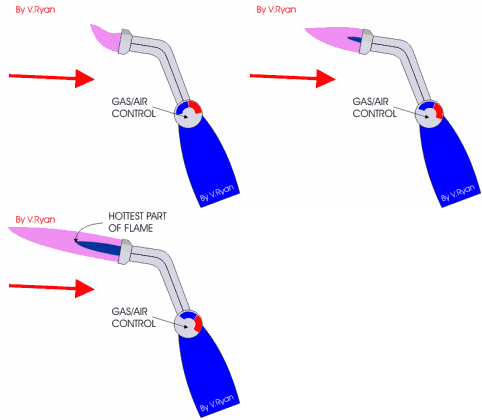
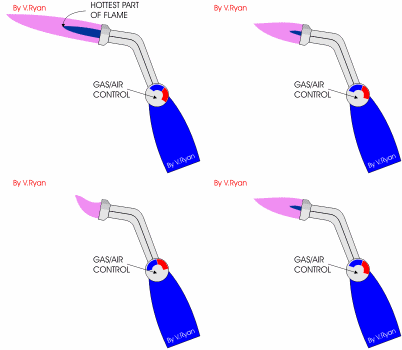
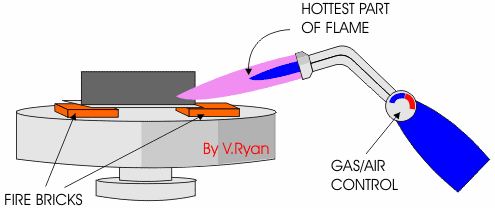
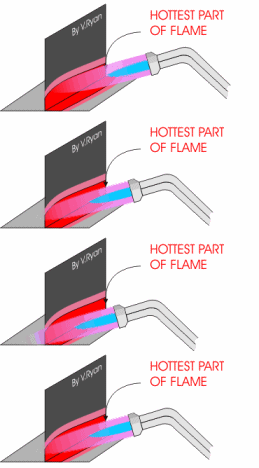
3. Once alight the gas-air control is turned to allow more air/gas through the nozzle which gives a longer, more fierce flame. The length of the flame can be adjusted with the control until the desired type of flame is achieved. As a rough guide, a blue section of flame will appear near the nozzle, the end of this is the hottest part of the flame. |
|
4. The two pieces of steel should have already been placed on the rotating table. Fire bricks are used to raise both pieces slightly off the surface of the table so that heat can flow all the way round it. Fire bricks should also be placed at the back and sides of the metal so that heat does not escape and is reflected back. |
|
|
|
|
|
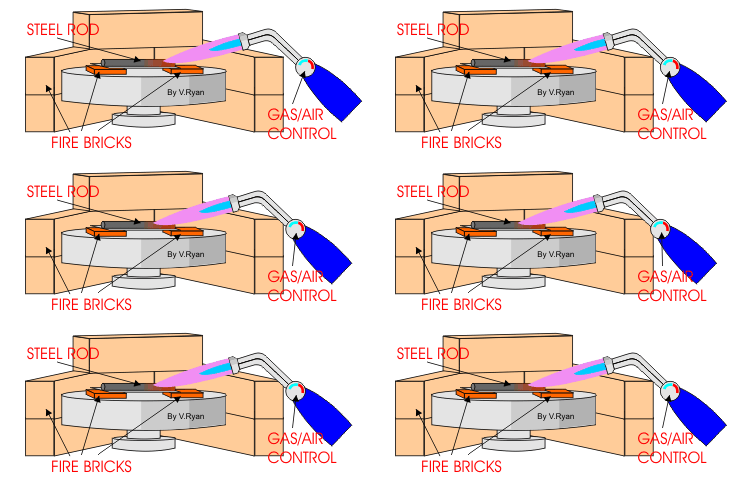
The steel is given a gentle overall heating first which raises the temperature slowly. This allows the steel to expand slowly and for the water in the flux to evaporate without moving the steel out of position. The flame is moved around the joint fairly quickly throughout this first stage of heating. |
|
|
|
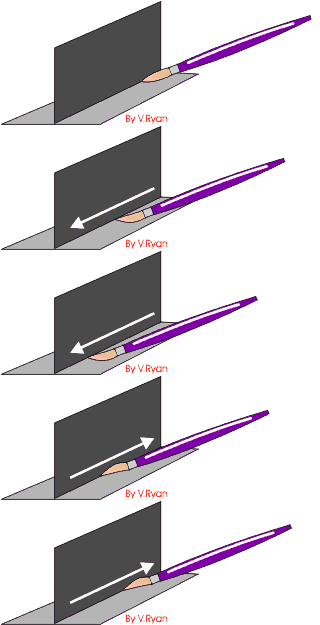
5. The flame is then moved forward with the blue tip of the flame nearly touching the steel. The focus of heat should now be on the joint, as the flame is slowly moved backwards and forwards along it. The joint will eventually become so hot that it becomes red in colour. |
|
|
6. A brazing rod
(copper-zinc alloy) is then pushed gently against the joint and if the
temperature is right the end of the rod will melt and begin to run along
the joint. The rod is fed into the joint until a brazed joint is complete. |
|
|
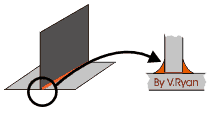
The diagram opposite shows how the copper-zinc alloy (brazing rod) forms a joint between the two pieces of steel sheet. |
|
EXTRA SAFETY: Using a brazing hearth and soldering/brazing is potentially dangerous as high temperatures are reached. Serious burns can result if safety procedures are ignored. Leather aprons and gloves will offer good protection if you accidentally touch hot metal. Goggles are essential as ‘splashes’ of hot flux or brazing rod (solder) could damage eyes permanently. Furthermore, if there is a need to pick up materials that have been heated on the hearth, always use steel tongs and place the hot material on a steel plate/block. The steel block/plate will conduct the heat away from the material without cooling it too quickly. |
|
THE BRAZING HEARTH - HEALTH AND SAFETY
V. Ryan © 2003 - 2009
| PDF FILE - CLICK HERE FOR PRINTABLE WORKSHEET | |
|
|
|
|
|
The brazing hearth is a very dangerous piece of
equipment if misused because it is possible to raise materials to high
temperatures. Furthermore, the temperatures are reached through the use of
a powerful flame. Some metals can even be heated to such high temperatures
that they become molten. |
| SAFETY INSTRUCTIONS: When using the brazing hearth always; Face the brazing hearth. Turn on the torch slowly and carefully. Never turn round with the torch, this is highly dangerous. Concentrate fully on the heating of the material. When finished heating the material place the torch back onto its rest Never pick up materials without using tongs and wearing leather gloves. Allow the material to cool before moving it elsewhere in the workshop. |
|
HARDENING AND TEMPERING
V. Ryan © 2005 - 2009
| PDF FILE - CLICK HERE FOR PRINTABLE WORKSHEET | |
|
Steel can be treated by intense heat to give it different properties of hardness and softness. This depends on the amount of carbon in the steel (only high carbon steel can be hardened and tempered). CARBON CONTENT OF COMMON STEELS: Mild steel: 0.4% carbon, Medium carbon steel approximately 0.8% carbon, High Carbon Steel approximately 1.2% carbon (this steel is also known as Tool Steel and includes Silver Steel and Gauge Plate). Mild steel and medium carbon steel do not have enough carbon to change their crystalline structure and consequently cannot be hardened and tempered. Medium carbon steel may become slightly tougher although it cannot be harden to the point where it cannot be filed or cut with a hacksaw (the classic test of whether steel has been hardened). If steel is heated until it glows red and is quenched in clean water immediately, it becomes very hard but also brittle. This means it is likely to break or snap if put under great pressure. On the other hand, if the red hot steel is allowed to cool slowly, the resulting steel will be easier to cut, shape and file as it will be relatively soft. However, the industrial heat treatment of steel is a very complex and precise science.
|
|
|
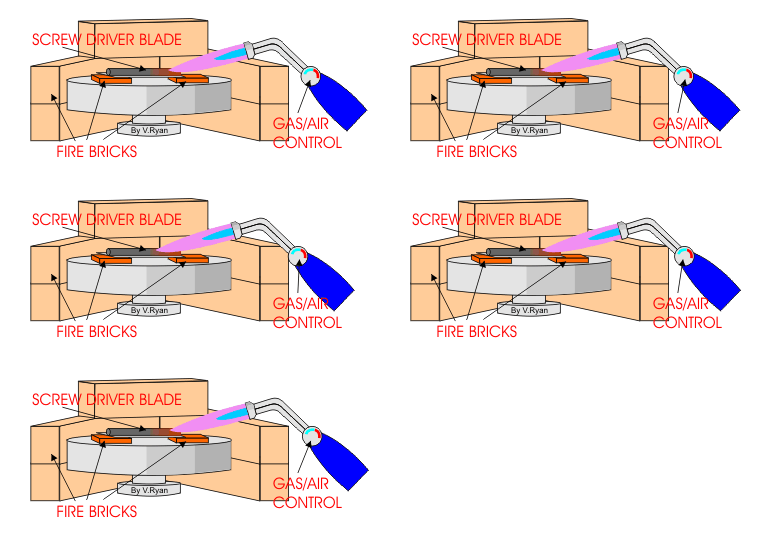
In a school workshop most heat treatment of metals takes place on a brazing hearth. A rotating table and fire bricks are essential. The fire bricks reflect the intense heat back on to the metal being heated. This is achieved by arranging the bricks in a semi-circle behind the metal being heated. Without the bricks, heat would escape and this would limit the temperature that could be reached. |
|
|
|
|
|
HARDENING AND TEMPERING |
|
|
Heat treatment of steel in a school workshop is normally a two stage process. For example, if a high carbon steel or silver steel screw driver blade has been manufactured, at some point it will have to be ‘’hardened’ to prevent it wearing down when used. On the other hand it will have to be ‘tempered’. This second heating process reduces the hardness a little but toughens the steel. It also significantly reduces the brittleness of the steel so that it does not break easily. The whole process is called ‘hardening and tempering’. |
|
|
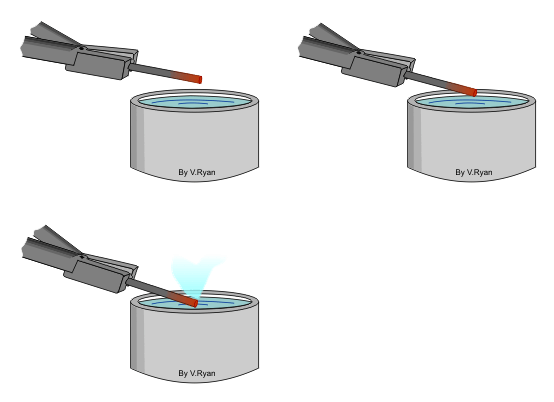
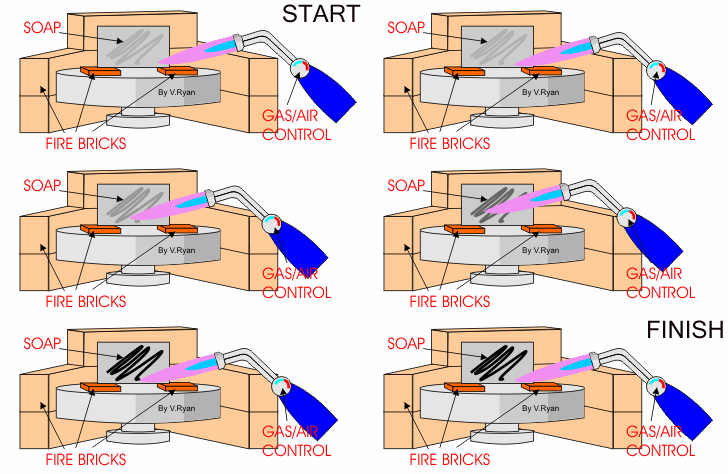
STAGE ONE: The screw driver blade is heated, slowly at first, warming up the whole blade. Then the heat is concentrated on the area at the end of the blade. This gradually becomes ‘red’ hot. |
|
|
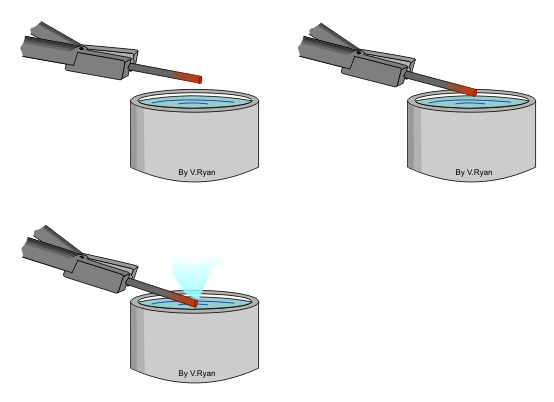
STAGE TWO: The screw driver blade is removed quickly from the brazing heart, with blacksmiths tongs and plunged into clean, cold water. Steam boils off from the water as the steel cools rapidly. At this stage the blade is very hard but brittle and will break easily. |
|
|
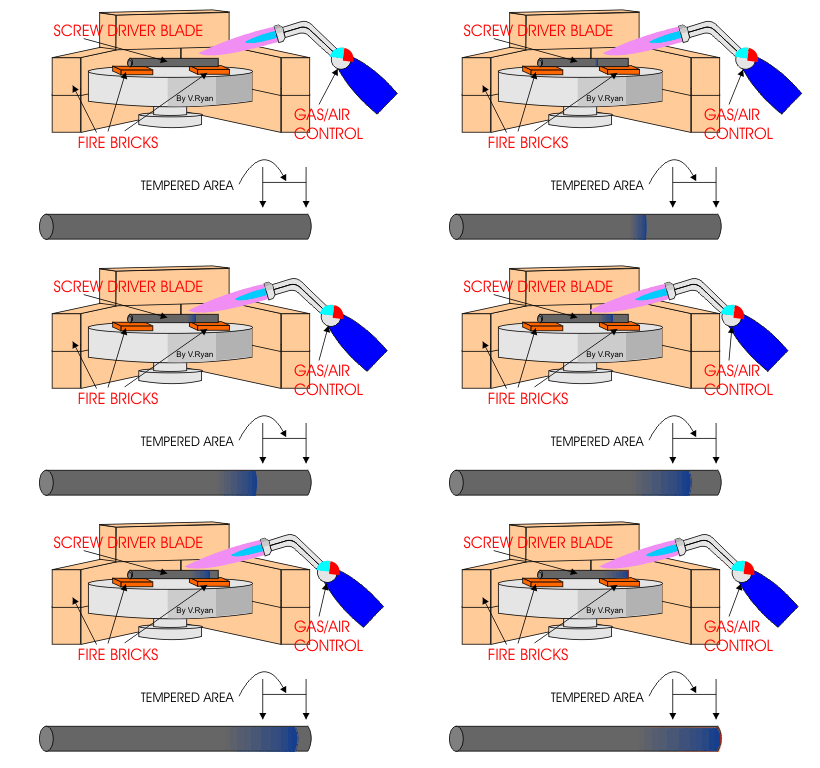
STAGE THREE: The screw driver blade is cleaned with emery cloth and heated again on the brazing hearth. Heat is concentrated at the end of the steel blade. The steel must be watched very carefully as it changes colour quite quickly. A blue line of heat will appear near the end of the blade and it travels towards the tip as the temperature rises along the blade. When the line of blue reaches the tip the brazing torch is turned off. The blue indicates the correct temperature of ‘tempering’. |
|
|
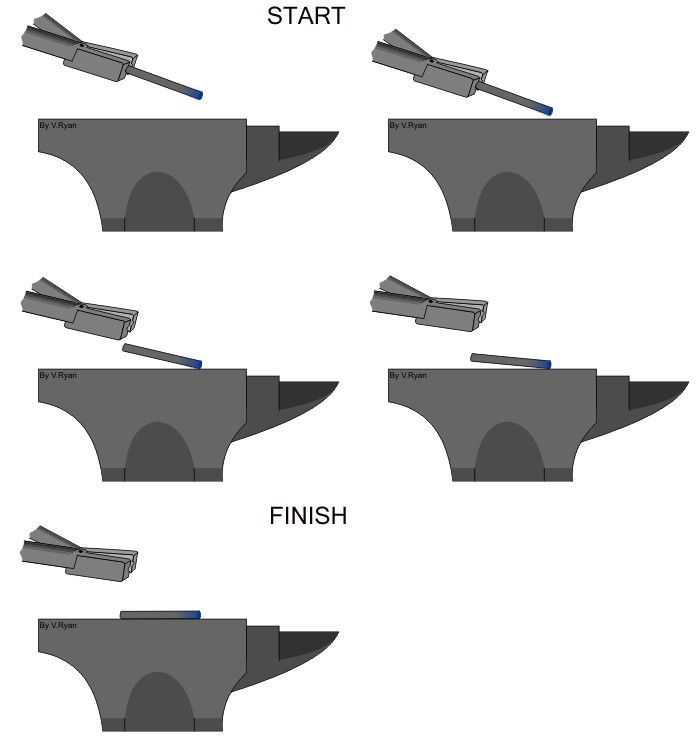
STAGE FOUR: The screw driver blade is placed on a steel surface, such as an anvil face. This conducts the heat away and allows slow cooling of the screw driver blade. When cold, the blade should be tough and hard wearing and unlikely to break or snap. This is due to the tempering process. |
|
|
USEFUL COLOUR INDICATORS OF TEMPERATURE |
|
|
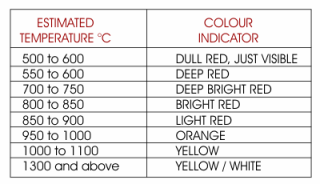
When heating steel on the brazing hearth, colour changes take place. These can be used to indicate the temperature of the metal. The table opposite is a rough guide. |
|
|
The table opposite shows the temperatures and the associated colours required when tempering steel for particular uses. For instance, when making wood turning tools, they must be heated to a brown colour, whilst tempering. |
|
CASE HARDENING OF MILD STEEL
V. Ryan © 2005 - 2009
| PDF FILE - CLICK HERE FOR PRINTABLE WORKSHEET | |
|
Case hardening is a simple method of hardening steel. It is less complex than hardening and tempering. This techniques is used for steels with a low carbon content. Carbon is added to the outer surface of the steel, to a depth of approximately 0.03mm. One advantage of this method of hardening steel is that the inner core is left untouched and so still processes properties such as flexibility and is still relatively soft. |
|
|
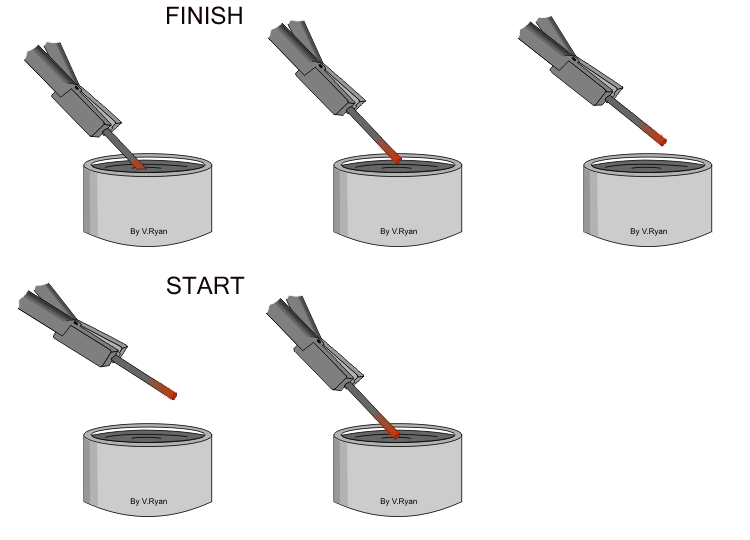
STAGE ONE: The steel is heated to red heat. It may only be necessary to harden one part of the steel and so heat can be concentrated in this area. |
|
|
STAGE TWO: The steel is removed from the brazing hearth with blacksmiths tongs and plunged into case hardening compound and allowed to cool a little. The case hardening compound is high in carbon. |
|
|
STAGE THREE: The steel is heated again to a red colour, removed from the brazing hearth and plunged into cold, clean water. |
|
|
|
|
|
The steel rod should now have a hardened outer surface and a flexible, soft interior. The process can be repeated to increase the depth of the hardened surface. |
|
ANNEALING METALS
V. Ryan © 2005 - 2009
| PDF FILE - CLICK HERE FOR PRINTABLE WORKSHEET | |||
|
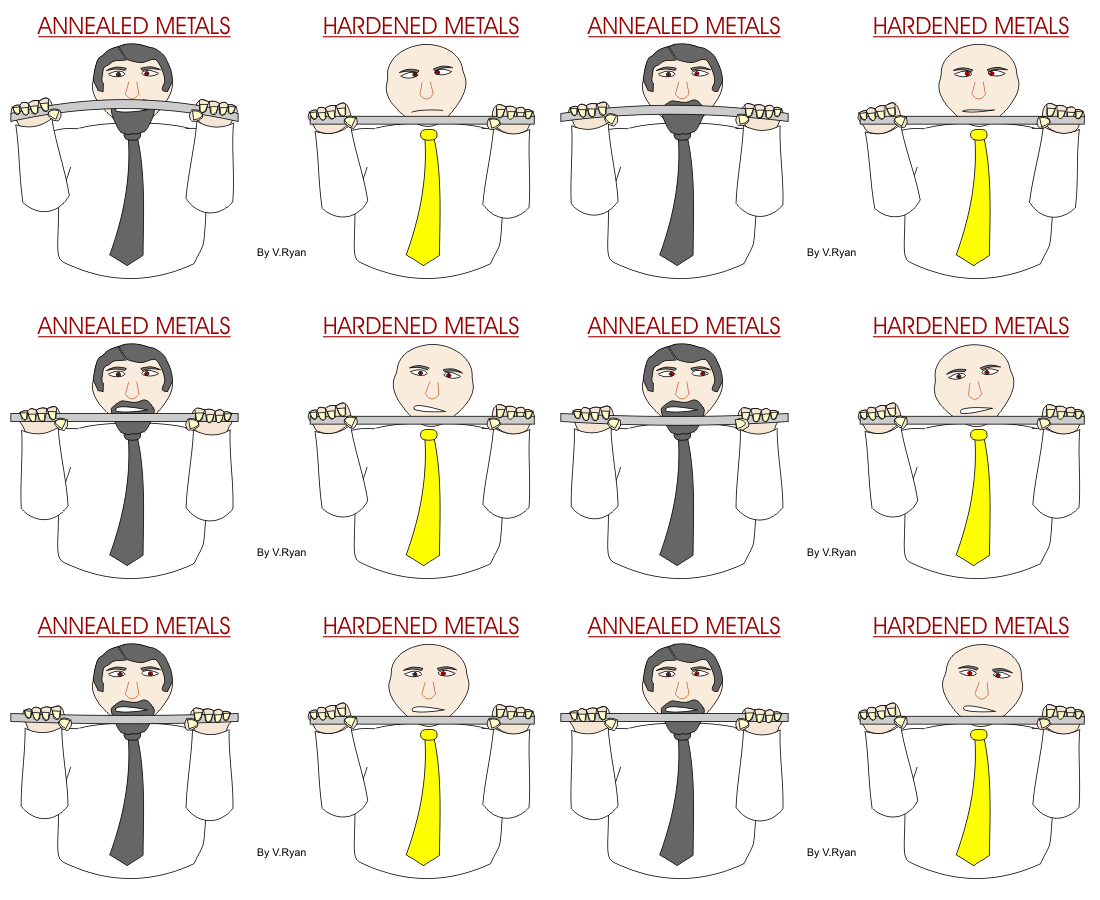
Annealing is a heat process whereby a metal is heated to a specific temperature /colour and then allowed to cool slowly. This softens the metal which means it can be cut and shaped more easily. Mild steel, is heated to a red heat and allowed to cool slowly. However, metals such as aluminium will melt if heated for too long. |
|||
|
Aluminium can be annealed but care must be taken whilst
heating. The flame should be held at a distance to the aluminium so that
it gives a generalised heating to the metal. |
|||
|
|
|
|
|||
|
PHYSICAL PROPERTIES: Annealed metals are relatively soft and can be cut and shaped more easily. They bend easily when pressure is applied. As a rule they are heated and allowed to cool slowly. The animation above shows that an annealed metal is usually softer and can be deformed more easily than metals that are not annealed. |
PHYSICAL PROPERTIES: Hardened metals are difficult to cut and shape. They are very difficult if not impossible to bend. As a rule they are heated and cooled very quickly by quenching in clean, cold water. The animation above shows that metals that have not been annealed are very difficult to deform. |
||
 |